| ... | @@ -24,7 +24,7 @@ To create a new TDL model by means of the TPlan2 textual representation for stru |
... | @@ -24,7 +24,7 @@ To create a new TDL model by means of the TPlan2 textual representation for stru |
|
|
|
|
|
|
|
- To translate a TDL model from the TDLan2 textual representation to the XF format (or the other way around), open the source model and press the "T" icon on the toolbar. The resulting model shall be stored in the same folder as the source model with the type of the model (**.tdlan2** or **.tdl**) appended to the name of the source model.
|
|
|
|
|
|
|
|
# Export TDL Test Objectives as Word tables
|
|
# Export TDL Structured Test Objectives and Test Purpose Descriptions as Word tables
|
|
|
|
|
|
|
|
## Install the plugin
|
|
## Install the plugin
|
|
|
|
|
|
| ... | @@ -36,19 +36,27 @@ After Eclipse restarts, you should be able to see a `W` button in the toolbar be |
... | @@ -36,19 +36,27 @@ After Eclipse restarts, you should be able to see a `W` button in the toolbar be |
|
|
|
|
|
|
|
## Use the export button!
|
|
## Use the export button!
|
|
|
|
|
|
|
|
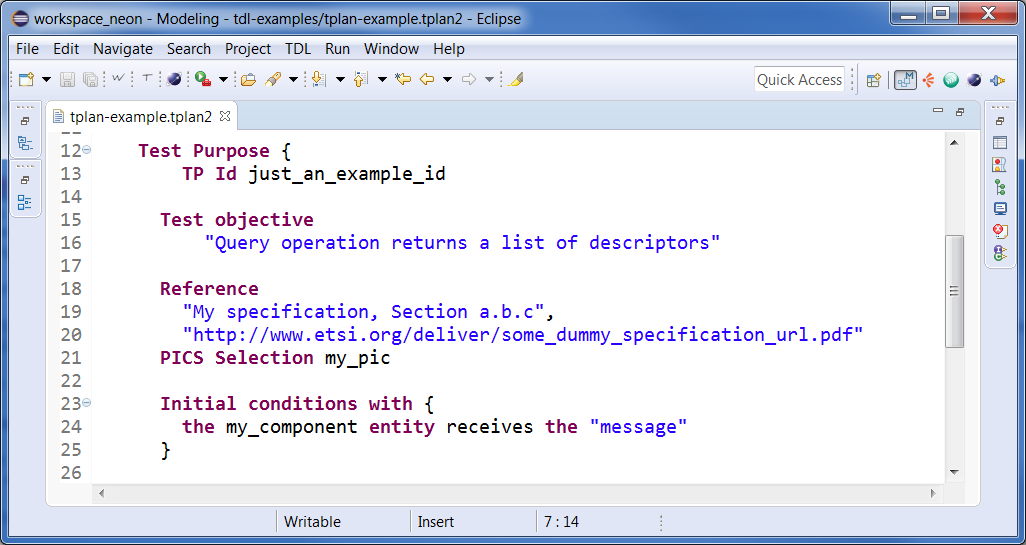
1. Open a **tplan2** document in Eclipse like this
|
|
1. Open a **tplan2** or a **tdltx/tdltxi** document containing structured test objectives and/or test purpose descriptions in Eclipse like this
|
|
|
|
|
|
|
|
[](https://tdl.etsi.org/wiki/index.php/File:Tdlan_example.PNG)
|
|
[](https://tdl.etsi.org/wiki/index.php/File:Tdlan_example.PNG)
|
|
|
|
|
|
|
|
1. Click on the `W` button in the toolbar and wait for a few seconds. It may happen that the Eclipse window is not responsive to clicks during the export execution, it does not mean that it is an error.
|
|
2. Click on the `W` button in the toolbar and select the preferred template. It may happen that the Eclipse window is not responsive to clicks during the export execution, it does not mean that it is an error.
|
|
|
|
|
3. When the processing is done, the newly created Word document will be in the same folder of the tplan/tdltx/tdltxi file and should appear in the Project Explorer
|
|
|
1. When the processing is done, the newly created Word document will be in the same folder of the tplan file and should appear in the Project explorer
|
|
4. If the file is not shown, select the project, right click and select *Refresh* (or hit F5 on the keyboard)
|
|
|
2. If the file is not shown, select the project, right click and select *Refresh* (or hit F5 on the keyboard)
|
|
|
|
|
|
|
|
|
|
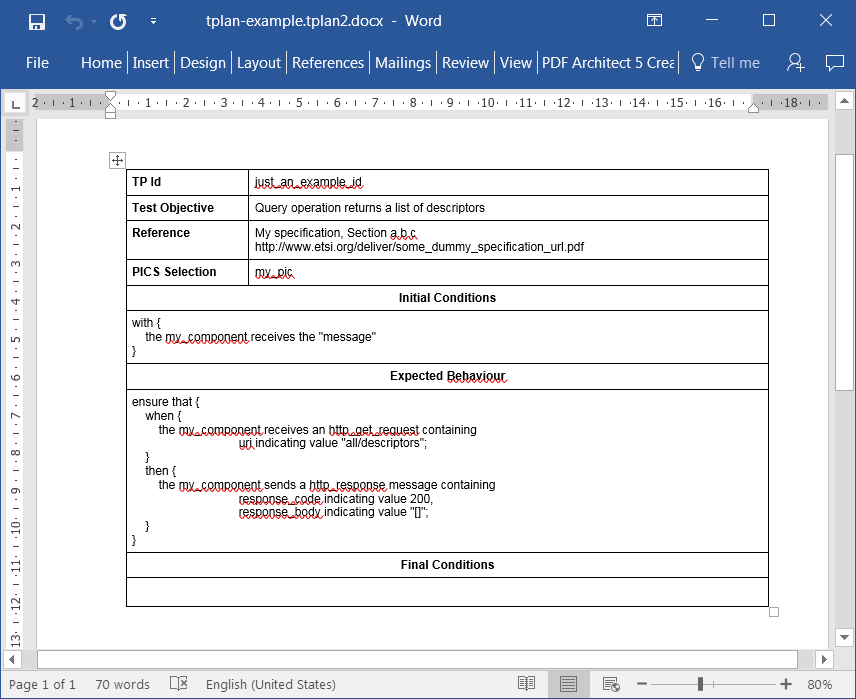
The result will look like:
|
|
The result will look like:
|
|
|
|
|
|
|
|
[](https://tdl.etsi.org/wiki/index.php/File:Word.PNG)
|
|
[](https://tdl.etsi.org/wiki/index.php/File:Word.PNG)
|
|
|
|
|
|
|
|
|
The result includes relevant parts of the original structured test objective / test purpose description substituted the corresponding placeholders in the templates. Some keywords may be substituted as part of the process (e.g. "entity" keywords, etc.). Textual comments are also included. To exclude certain textual comments from the output, add a "!" prefix in the comment, e.g.:
|
|
|
|
|
|
|
|
```
|
|
|
|
//Comment to be included
|
|
|
|
//! Comment to be excluded
|
|
|
|
```
|
|
|
|
The output will include only the first comment.
|
|
|
|
|
|
|
|
|
|
|
# Translate TDL to TTCN-3
|
|
# Translate TDL to TTCN-3
|
|
|
|
|
|
|
|
To tranlate a TDL model to TTCN-3 make sure to previously install the [TRex2/T3 Tools](https://t3tools.informatik.uni-goettingen.de/trac) and the components from the update site:
|
|
To tranlate a TDL model to TTCN-3 make sure to previously install the [TRex2/T3 Tools](https://t3tools.informatik.uni-goettingen.de/trac) and the components from the update site:
|
| ... | | ... | |