Web API Fuzz Testing (ULTIMATE)
Web API fuzzing performs fuzz testing of API operation parameters. Fuzz testing sets operation parameters to unexpected values in an effort to cause unexpected behavior and errors in the API backend. This helps you discover bugs and potential security issues that other QA processes may miss.
We recommend that you use fuzz testing in addition to GitLab Secure's other security scanners and your own test processes. If you're using GitLab CI/CD, you can run fuzz tests as part your CI/CD workflow.
When Web API fuzzing runs
Web API fuzzing runs in the fuzz stage of the CI/CD pipeline. To ensure API fuzzing scans the
latest code, your CI/CD pipeline should deploy changes to a test environment in one of the stages
preceding the fuzz stage.
Note the following changes have been made to the API fuzzing template:
- In GitLab 14.0 and later, you must define a
fuzzstage in your.gitlab-ci.ymlfile. - In GitLab 13.12 and earlier, the API fuzzing template defines
build,test,deploy, andfuzzstages. Thefuzzstage runs last by default. The predefined stages were deprecated, and removed from theAPI-Fuzzing.latest.gitlab-ci.ymltemplate. We plan to remove them in a future GitLab version.
If your pipeline is configured to deploy to the same web server on each run, running a pipeline while another is still running could cause a race condition in which one pipeline overwrites the code from another. The API to scan should be excluded from changes for the duration of a fuzzing scan. The only changes to the API should be from the fuzzing scanner. Any changes made to the API (for example, by users, scheduled tasks, database changes, code changes, other pipelines, or other scanners) during a scan could cause inaccurate results.
You can run a Web API fuzzing scan using the following methods:
- OpenAPI Specification - version 2, and 3.
- GraphQL Schema
- HTTP Archive (HAR)
- Postman Collection - version 2.0 or 2.1
Example projects using these methods are available:
- Example OpenAPI v2 Specification project
- Example HTTP Archive (HAR) project
- Example Postman Collection project
- Example GraphQL project
- Example SOAP project
- Authentication Token using Selenium
Enable Web API fuzzing
Requirements:
-
One of the following web API types:
- REST API
- SOAP
- GraphQL
- Form bodies, JSON, or XML
-
One of the following assets to provide APIs to test:
- OpenAPI v2 or v3 API definition
- HTTP Archive (HAR) of API requests to test
- Postman Collection v2.0 or v2.1
WARNING: Never run fuzz testing against a production server. Not only can it perform any function that the API can, it may also trigger bugs in the API. This includes actions like modifying and deleting data. Only run fuzzing against a test server.
To enable Web API fuzzing:
-
Include the API fuzzing template in your
.gitlab-ci.ymlfile. -
From GitLab 13.10 and later, use the Web API fuzzing configuration form.
-
For manual configuration instructions, see the respective section, depending on the API type:
-
Otherwise, see Web API fuzzing configuration form.
In GitLab 14.0 and later, API fuzzing configuration files must be in your repository's
.gitlab directory instead of your repository's root.
Web API fuzzing configuration form
Introduced in GitLab 13.10.
The API fuzzing configuration form helps you create or modify your project's API fuzzing configuration. The form lets you choose values for the most common API fuzzing options and builds a YAML snippet that you can paste in your GitLab CI/CD configuration.
Configure Web API fuzzing in the UI
To generate an API Fuzzing configuration snippet:
- On the top bar, select Main menu > Projects and find your project.
- On the left sidebar, select Security and Compliance > Security configuration.
- In the API Fuzzing row, select Enable API Fuzzing.
- Complete the fields. For details see Available CI/CD variables.
- Select Generate code snippet. A modal opens with the YAML snippet corresponding to the options you've selected in the form.
- Do one of the following:
- To copy the snippet to your clipboard, select Copy code only.
- To add the snippet to your project's
.gitlab-ci.ymlfile, select Copy code and open.gitlab-ci.ymlfile. The Pipeline Editor opens.- Paste the snippet into the
.gitlab-ci.ymlfile. - Select the Lint tab to confirm the edited
.gitlab-ci.ymlfile is valid. - Select the Edit tab, then select Commit changes.
- Paste the snippet into the
When the snippet is committed to the .gitlab-ci.yml file, pipelines include an API Fuzzing job.
OpenAPI Specification
- Support for OpenAPI Specification v3.0 was introduced in GitLab 13.9.
- Support for OpenAPI Specification using YAML format was introduced in GitLab 14.0.
- Support for OpenAPI Specification v3.1 was introduced in GitLab 14.2.
- Support to generate media type
application/xmlwas introduced in GitLab 14.8.- Support to select media types was introduced in GitLab 14.10.
The OpenAPI Specification (formerly the Swagger Specification) is an API description format for REST APIs. This section shows you how to configure API fuzzing using an OpenAPI Specification to provide information about the target API to test. OpenAPI Specifications are provided as a file system resource or URL. Both JSON and YAML OpenAPI formats are supported.
API fuzzing uses an OpenAPI document to generate the request body. When a request body is required, the body generation is limited to these body types:
application/x-www-form-urlencodedmultipart/form-dataapplication/jsonapplication/xml
OpenAPI and media types
A media type (formerly known as MIME type) is an identifier for file formats and format contents transmitted. A OpenAPI document lets you specify that a given operation can accept different media types, hence a given request can send data using different file content. As for example, a PUT /user operation to update user data could accept data in either XML (media type application/xml) or JSON (media type application/json) format.
OpenAPI 2.x lets you specify the accepted media types globally or per operation, and OpenAPI 3.x lets you specify the accepted media types per operation. API Fuzzing checks the listed media types and tries to produce sample data for each supported media type.
- In GitLab 14.10 and later, the default behavior is to select one of the supported media types to use. The first supported media type is chosen from the list. This behavior is configurable.
- In GitLab 14.9 and earlier, the default behavior is to perform testing using all supported media types. This means if two media types are listed (for example,
application/jsonandapplication/xml), tests are performed using JSON, and then the same tests using XML.
Testing the same operation (for example, POST /user) using different media types (for example, application/json and application/xml) is not always desirable.
For example, if the target application executes the same code regardless of the request content type, it takes longer to finish the test session, and it may report duplicate vulnerabilities related to the request body depending on the target app.
The environment variable FUZZAPI_OPENAPI_ALL_MEDIA_TYPES lets you specify whether or not to use all supported media types instead of one when generating requests for a given operation. When the environmental variable FUZZAPI_OPENAPI_ALL_MEDIA_TYPES is set to any value, API Fuzzing tries to generate requests for all supported media types instead of one in a given operation. This causes testing to take longer as testing is repeated for each provided media type.
Alternatively, the variable FUZZAPI_OPENAPI_MEDIA_TYPES is used to provide a list of media types that each is tested. Providing more than one media type causes testing to take longer, as testing is performed for each media type selected. When the environment variable FUZZAPI_OPENAPI_MEDIA_TYPES is set to a list of media types, only the listed media types are included when creating requests.
Multiple media types in FUZZAPI_OPENAPI_MEDIA_TYPES must separated by a colon (:). For example, to limit request generation to the media types application/x-www-form-urlencoded and multipart/form-data, set the environment variable FUZZAPI_OPENAPI_MEDIA_TYPES to application/x-www-form-urlencoded:multipart/form-data. Only supported media types in this list are included when creating requests, though unsupported media types are always skipped. A media type text may contain different sections. For example, application/vnd.api+json; charset=UTF-8 is a compound of type "/" [tree "."] subtype ["+" suffix]* [";" parameter]. Parameters are not taken into account when filtering media types on request generation.
The environment variables FUZZAPI_OPENAPI_ALL_MEDIA_TYPES and FUZZAPI_OPENAPI_MEDIA_TYPES allow you to decide how to handle media types. These settings are mutually exclusive. If both are enabled, API Fuzzing reports an error.
Configure Web API fuzzing with an OpenAPI Specification
To configure API fuzzing in GitLab with an OpenAPI Specification:
-
Add the
fuzzstage to your.gitlab-ci.ymlfile. -
Include the
API-Fuzzing.gitlab-ci.ymltemplate in your.gitlab-ci.ymlfile. -
Provide the profile by adding the
FUZZAPI_PROFILECI/CD variable to your.gitlab-ci.ymlfile. The profile specifies how many tests are run. SubstituteQuick-10for the profile you choose. For more details, see API fuzzing profiles.variables: FUZZAPI_PROFILE: Quick-10 -
Provide the location of the OpenAPI Specification. You can provide the specification as a file or URL. Specify the location by adding the
FUZZAPI_OPENAPIvariable. -
Provide the target API instance's base URL. Use either the
FUZZAPI_TARGET_URLvariable or anenvironment_url.txtfile.Adding the URL in an
environment_url.txtfile at your project's root is great for testing in dynamic environments. To run API fuzzing against an application dynamically created during a GitLab CI/CD pipeline, have the application persist its URL in anenvironment_url.txtfile. API fuzzing automatically parses that file to find its scan target. You can see an example of this in the Auto DevOps CI YAML.
Example .gitlab-ci.yml file using an OpenAPI Specification:
stages:
- fuzz
include:
- template: API-Fuzzing.gitlab-ci.yml
variables:
  FUZZAPI_PROFILE: Quick-10
FUZZAPI_OPENAPI: test-api-specification.json
FUZZAPI_TARGET_URL: http://test-deployment/This is a minimal configuration for API Fuzzing. From here you can:
- Run your first scan.
- Add authentication.
- Learn how to handle false positives.
For details of API fuzzing configuration options, see Available CI/CD variables.
HTTP Archive (HAR)
The HTTP Archive format (HAR) is an archive file format for logging HTTP transactions. When used with the GitLab API fuzzer, HAR must contain records of calling the web API to test. The API fuzzer extracts all the requests and uses them to perform testing.
For more details, including how to create a HAR file, see HTTP Archive format.
WARNING: HAR files may contain sensitive information such as authentication tokens, API keys, and session cookies. We recommend that you review the HAR file contents before adding them to a repository.
Configure Web API fuzzing with a HAR file
To configure API fuzzing to use a HAR file:
-
Add the
fuzzstage to your.gitlab-ci.ymlfile. -
Include the
API-Fuzzing.gitlab-ci.ymltemplate in your.gitlab-ci.ymlfile. -
Provide the profile by adding the
FUZZAPI_PROFILECI/CD variable to your.gitlab-ci.ymlfile. The profile specifies how many tests are run. SubstituteQuick-10for the profile you choose. For more details, see API fuzzing profiles.variables: FUZZAPI_PROFILE: Quick-10 -
Provide the location of the HAR specification. You can provide the specification as a file or URL. URL support was introduced in GitLab 13.10 and later. Specify the location by adding the
FUZZAPI_HARvariable. -
The target API instance's base URL is also required. Provide it by using the
FUZZAPI_TARGET_URLvariable or anenvironment_url.txtfile.Adding the URL in an
environment_url.txtfile at your project's root is great for testing in dynamic environments. To run API fuzzing against an app dynamically created during a GitLab CI/CD pipeline, have the app persist its domain in anenvironment_url.txtfile. API fuzzing automatically parses that file to find its scan target. You can see an example of this in our Auto DevOps CI YAML.
Example .gitlab-ci.yml file using a HAR file:
stages:
- fuzz
include:
- template: API-Fuzzing.gitlab-ci.yml
variables:
FUZZAPI_PROFILE: Quick-10
FUZZAPI_HAR: test-api-recording.har
FUZZAPI_TARGET_URL: http://test-deployment/This example is a minimal configuration for API fuzzing. From here you can:
- Run your first scan.
- Add authentication.
- Learn how to handle false positives.
For details of API fuzzing configuration options, see Available CI/CD variables.
GraphQL Schema
Support for GraphQL Schema was introduced in GitLab 15.4.
GraphQL is a query language for your API and an alternative to REST APIs. API Fuzzing supports testing GraphQL endpoints multiple ways:
- Test using the GraphQL Schema. Introduced in GitLab 15.4.
- Test using a recording (HAR) of GraphQL queries.
- Test using a Postman Collection containing GraphQL queries.
This section documents how to test using a GraphQL schema. The GraphQL schema support in API Fuzzing is able to query the schema from endpoints that support introspection. Introspection is enabled by default to allow tools like GraphiQL to work.
API Fuzzing scanning with a GraphQL endpoint URL
The GraphQL support in API Fuzzing is able to query a GraphQL endpoint for the schema.
NOTE: The GraphQL endpoint must support introspection queries for this method to work correctly.
To configure API Fuzzing to use an GraphQL endpoint URL that provides information about the target API to test:
-
Include the
API-Fuzzing.gitlab-ci.ymltemplate in your.gitlab-ci.ymlfile. -
Provide the GraphQL endpoint path, for example
/api/graphql. Specify the path by adding theFUZZAPI_GRAPHQLvariable. -
The target API instance's base URL is also required. Provide it by using the
FUZZAPI_TARGET_URLvariable or anenvironment_url.txtfile.Adding the URL in an
environment_url.txtfile at your project's root is great for testing in dynamic environments. See the dynamic environment solutions section of our documentation for more information.
Complete example configuration of using a GraphQL endpoint URL:
stages:
- fuzz
include:
- template: API-Fuzzing.gitlab-ci.yml
apifuzzer_fuzz:
variables:
FUZZAPI_GRAPHQL: /api/graphql
FUZZAPI_TARGET_URL: http://test-deployment/This example is a minimal configuration for API Fuzzing. From here you can:
- Run your first scan.
- Add authentication.
- Learn how to handle false positives.
API Fuzzing with a GraphQL Schema file
API Fuzzing can use a GraphQL schema file to understand and test a GraphQL endpoint that has introspection disabled. To use a GraphQL schema file, it must be in the introspection JSON format. A GraphQL schema can be converted to a the introspection JSON format using an online 3rd party tool: https://transform.tools/graphql-to-introspection-json.
To configure API Fuzzing to use a GraphQl schema file that provides information about the target API to test:
-
Include the
API-Fuzzing.gitlab-ci.ymltemplate in your.gitlab-ci.ymlfile. -
Provide the GraphQL endpoint path, for example
/api/graphql. Specify the path by adding theFUZZAPI_GRAPHQLvariable. -
Provide the location of the GraphQL schema file. You can provide the location as a file path or URL. Specify the location by adding the
FUZZAPI_GRAPHQL_SCHEMAvariable. -
The target API instance's base URL is also required. Provide it by using the
FUZZAPI_TARGET_URLvariable or anenvironment_url.txtfile.Adding the URL in an
environment_url.txtfile at your project's root is great for testing in dynamic environments. See the dynamic environment solutions section of our documentation for more information.
Complete example configuration of using an GraphQL schema file:
stages:
- fuzz
include:
- template: API-Fuzzing.gitlab-ci.yml
apifuzzer_fuzz:
variables:
FUZZAPI_GRAPHQL: /api/graphql
FUZZAPI_GRAPHQL_SCHEMA: test-api-graphql.schema
FUZZAPI_TARGET_URL: http://test-deployment/Complete example configuration of using an GraphQL schema file URL:
stages:
- fuzz
include:
- template: API-Fuzzing.gitlab-ci.yml
apifuzzer_fuzz:
variables:
FUZZAPI_GRAPHQL: /api/graphql
FUZZAPI_GRAPHQL_SCHEMA: http://file-store/files/test-api-graphql.schema
FUZZAPI_TARGET_URL: http://test-deployment/This example is a minimal configuration for API Fuzzing. From here you can:
- Run your first scan.
- Add authentication.
- Learn how to handle false positives.
Postman Collection
The Postman API Client is a popular tool that developers and testers use to call various types of APIs. The API definitions can be exported as a Postman Collection file for use with API Fuzzing. When exporting, make sure to select a supported version of Postman Collection: v2.0 or v2.1.
When used with the GitLab API fuzzer, Postman Collections must contain definitions of the web API to test with valid data. The API fuzzer extracts all the API definitions and uses them to perform testing.
WARNING: Postman Collection files may contain sensitive information such as authentication tokens, API keys, and session cookies. We recommend that you review the Postman Collection file contents before adding them to a repository.
Configure Web API fuzzing with a Postman Collection file
To configure API fuzzing to use a Postman Collection file:
-
Add the
fuzzstage to your.gitlab-ci.ymlfile. -
Include the
API-Fuzzing.gitlab-ci.ymltemplate in your.gitlab-ci.ymlfile. -
Provide the profile by adding the
FUZZAPI_PROFILECI/CD variable to your.gitlab-ci.ymlfile. The profile specifies how many tests are run. SubstituteQuick-10for the profile you choose. For more details, see API fuzzing profiles.variables: FUZZAPI_PROFILE: Quick-10 -
Provide the location of the Postman Collection specification. You can provide the specification as a file or URL. URL support was introduced in GitLab 13.10 and later. Specify the location by adding the
FUZZAPI_POSTMAN_COLLECTIONvariable. -
Provide the target API instance's base URL. Use either the
FUZZAPI_TARGET_URLvariable or anenvironment_url.txtfile.Adding the URL in an
environment_url.txtfile at your project's root is great for testing in dynamic environments. To run API fuzzing against an app dynamically created during a GitLab CI/CD pipeline, have the app persist its domain in anenvironment_url.txtfile. API fuzzing automatically parses that file to find its scan target. You can see an example of this in our Auto DevOps CI YAML.
Example .gitlab-ci.yml file using a Postman Collection file:
stages:
- fuzz
include:
- template: API-Fuzzing.gitlab-ci.yml
variables:
FUZZAPI_PROFILE: Quick-10
FUZZAPI_POSTMAN_COLLECTION: postman-collection_serviceA.json
FUZZAPI_TARGET_URL: http://test-deployment/This is a minimal configuration for API Fuzzing. From here you can:
- Run your first scan.
- Add authentication.
- Learn how to handle false positives.
For details of API fuzzing configuration options, see Available CI/CD variables.
Postman variables
- Support for Postman Environment file format was introduced in GitLab 15.1.
- Support for multiple variable files was introduced in GitLab 15.1.
- Support for Postman variable scopes: Global and Environment was introduced in GitLab 15.1.
Variables in Postman Client
Postman allows the developer to define placeholders that can be used in different parts of the requests. These placeholders are called variables, as explained in using variables. You can use variables to store and reuse values in your requests and scripts. For example, you can edit the collection to add variables to the document:
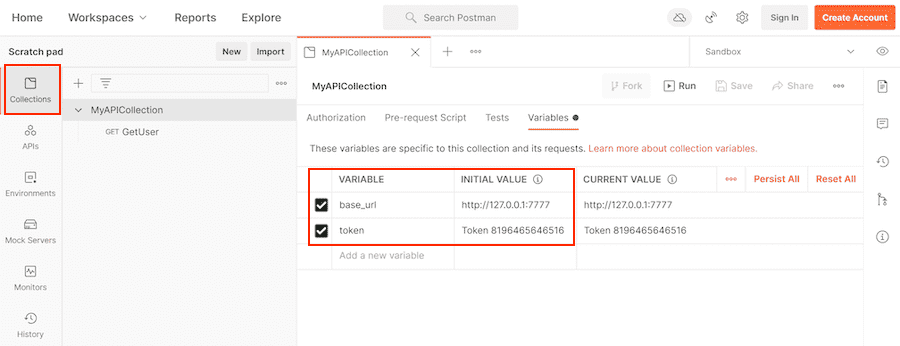
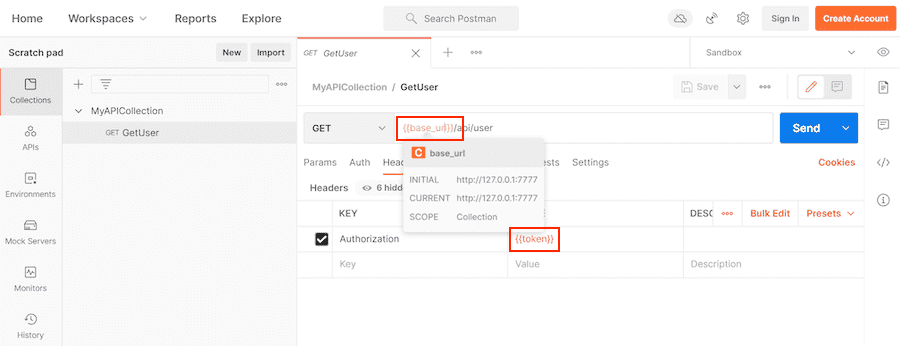
Or alternatively, you can add variables in an environment:

You can then use the variables in sections such as URL, headers, and others:
Postman has grown from a basic client tool with a nice UX experience to a more complex ecosystem that allows testing APIs with scripts, creating complex collections that trigger secondary requests, and setting variables along the way. Not every feature in the Postman ecosystem is supported. For example, scripts are not supported. The main focus of the Postman support is to ingest Postman Collection definitions that are used by the Postman Client and their related variables defined in the workspace, environments, and the collections themselves.
Postman allows creating variables in different scopes. Each scope has a different level of visibility in the Postman tools. For example, you can create a variable in a global environment scope that is seen by every operation definition and workspace. You can also create a variable in a specific environment scope that is only visible and used when that specific environment is selected for use. Some scopes are not always available, for example in the Postman ecosystem you can create requests in the Postman Client, these requests do not have a local scope, but test scripts do.
Variable scopes in Postman can be a daunting topic and not everyone is familiar with it. We strongly recommend that you read Variable Scopes from Postman documentation before moving forward.
As mentioned above, there are different variable scopes, and each of them has a purpose and can be used to provide more flexibility to your Postman document. There is an important note on how values for variables are computed, as per Postman documentation:
If a variable with the same name is declared in two different scopes, the value stored in the variable with narrowest scope is used. For example, if there is a global variable named
usernameand a local variable namedusername, the local value is used when the request runs.
The following is a summary of the variable scopes supported by the Postman Client and API Fuzzing:
- Global Environment (Global) scope is a special pre-defined environment that is available throughout a workspace. We can also refer to the global environment scope as the global scope. The Postman Client allows exporting the global environment into a JSON file, which can be used with API Fuzzing.
- Environment scope is a named group of variables created by a user in the Postman Client. The Postman Client supports a single active environment along with the global environment. The variables defined in an active user-created environment take precedence over variables defined in the global environment. The Postman Client allows exporting your environment into a JSON file, which can be used with API Fuzzing.
- Collection scope is a group of variables declared in a given collection. The collection variables are available to the collection where they have been declared and the nested requests or collections. Variables defined in the collection scope take precedence over the global environment scope and also the environment scope. The Postman Client can export one or more collections into a JSON file, this JSON file contains selected collections, requests, and collection variables.
-
API Fuzzing Scope is a new scope added by API Fuzzing to allow users to provide extra variables, or override variables defined in other supported scopes. This scope is not supported by Postman. The API Fuzzing Scope variables are provided using a custom JSON file format.
- Override values defined in the environment or collection
- Defining variables from scripts
- Define a single row of data from the unsupported data scope
- Data scope is a group of variables in which their name and values come from JSON or CSV files. A Postman collection runner like Newman or Postman Collection Runner executes the requests in a collection as many times as entries have the JSON or CSV file. A good use case for these variables is to automate tests using scripts in Postman. API Fuzzing does not support reading data from a CSV or JSON file.
- Local scope are variables that are defined in Postman scripts. API Fuzzing does not support Postman scripts and by extension, variables defined in scripts. You can still provide values for the script-defined variables by defining them in one of the supported scopes, or our custom JSON format.
Not all scopes are supported by API Fuzzing and variables defined in scripts are not supported. The following table is sorted by broadest scope to narrowest scope.
| Scope | Postman | API Fuzzing | Comment |
|---|---|---|---|
| Global Environment | Yes | Yes | Special pre-defined environment |
| Environment | Yes | Yes | Named environments |
| Collection | Yes | Yes | Defined in your postman collection |
| API Fuzzing Scope | No | Yes | Custom scope added by API Fuzzing |
| Data | Yes | No | External files in CSV or JSON format |
| Local | Yes | No | Variables defined in scripts |
For more details on how to define variables and export variables in different scopes, see:
Exporting from Postman Client
The Postman Client lets you export different file formats, for instance, you can export a Postman collection or a Postman environment. The exported environment can be the global environment (which is always available) or can be any custom environment you previously have created. When you export a Postman Collection, it may contain only declarations for collection and local scoped variables; environment scoped variables are not included.
To get the declaration for environment scoped variables, you have to export a given environment at the time. Each exported file only includes variables from the selected environment.
For more details on exporting variables in different supported scopes, see:
API Fuzzing Scope, custom JSON file format
Our custom JSON file format is a JSON object where each object property represents a variable name and the property value represents the variable value. This file can be created using your favorite text editor, or it can be produced by an earlier job in your pipeline.
This example defines two variables base_url and token in the API Fuzzing scope:
{
"base_url": "http://127.0.0.1/",
"token": "Token 84816165151"
}Using scopes with API Fuzzing
The scopes: global, environment, collection, and GitLab API Fuzzing are supported in GitLab 15.1 and later. GitLab 15.0 and earlier, supports only the collection, and GitLab API Fuzzing scopes.
The following table provides a quick reference for mapping scope files/URLs to API Fuzzing configuration variables:
| Scope | How to Provide |
|---|---|
| Global Environment | FUZZAPI_POSTMAN_COLLECTION_VARIABLES |
| Environment | FUZZAPI_POSTMAN_COLLECTION_VARIABLES |
| Collection | FUZZAPI_POSTMAN_COLLECTION |
| API Fuzzing Scope | FUZZAPI_POSTMAN_COLLECTION_VARIABLES |
| Data | Not supported |
| Local | Not supported |
The Postman Collection document automatically includes any collection scoped variables. The Postman Collection is provided with the configuration variable FUZZAPI_POSTMAN_COLLECTION. This variable can be set to a single exported Postman collection.
Variables from other scopes are provided through the FUZZAPI_POSTMAN_COLLECTION_VARIABLES configuration variable. The configuration variable supports a comma (,) delimited file list in GitLab 15.1 and later. GitLab 15.0 and earlier, supports only one single file. The order of the files provided is not important as the files provide the needed scope information.
The configuration variable FUZZAPI_POSTMAN_COLLECTION_VARIABLES can be set to:
Undefined Postman variables
There is a chance that API Fuzzing engine does not find all variables references that your Postman collection file is using. Some cases can be:
- You are using data or local scoped variables, and as stated previously these scopes are not supported by API Fuzzing. Thus, assuming the values for these variables have not been provided through the API Fuzzing scope, then the values of the data and local scoped variables are undefined.
- A variable name was typed incorrectly, and the name does not match the defined variable.
- Postman Client supports a new dynamic variable that is not supported by API Fuzzing.
When possible, API Fuzzing follows the same behavior as the Postman Client does when dealing with undefined variables. The text of the variable reference remains the same, and there is no text substitution. The same behavior also applies to any unsupported dynamic variables.
For example, if a request definition in the Postman Collection references the variable {{full_url}} and the variable is not found it is left unchanged with the value {{full_url}}.
Dynamic Postman variables
In addition to variables that a user can define at various scope levels, Postman has a set of pre-defined variables called dynamic variables. The dynamic variables are already defined and their name is prefixed with a dollar sign ($), for instance, $guid. Dynamic variables can be used like any other variable, and in the Postman Client, they produce random values during the request/collection run.
An important difference between API Fuzzing and Postman is that API Fuzzing returns the same value for each usage of the same dynamic variables. This differs from the Postman Client behavior which returns a random value on each use of the same dynamic variable. In other words, API Fuzzing uses static values for dynamic variables while Postman uses random values.
The supported dynamic variables during the scanning process are:
| Variable | Value |
|---|---|
$guid |
611c2e81-2ccb-42d8-9ddc-2d0bfa65c1b4 |
$isoTimestamp |
2020-06-09T21:10:36.177Z |
$randomAbbreviation |
PCI |
$randomAbstractImage |
http://no-a-valid-host/640/480/abstract |
$randomAdjective |
auxiliary |
$randomAlphaNumeric |
a |
$randomAnimalsImage |
http://no-a-valid-host/640/480/animals |
$randomAvatarImage |
https://no-a-valid-host/path/to/some/image.jpg |
$randomBankAccount |
09454073 |
$randomBankAccountBic |
EZIAUGJ1 |
$randomBankAccountIban |
MU20ZPUN3039684000618086155TKZ |
$randomBankAccountName |
Home Loan Account |
$randomBitcoin |
3VB8JGT7Y4Z63U68KGGKDXMLLH5 |
$randomBoolean |
true |
$randomBs |
killer leverage schemas |
$randomBsAdjective |
viral |
$randomBsBuzz |
repurpose |
$randomBsNoun |
markets |
$randomBusinessImage |
http://no-a-valid-host/640/480/business |
$randomCatchPhrase |
Future-proofed heuristic open architecture |
$randomCatchPhraseAdjective |
Business-focused |
$randomCatchPhraseDescriptor |
bandwidth-monitored |
$randomCatchPhraseNoun |
superstructure |
$randomCatsImage |
http://no-a-valid-host/640/480/cats |
$randomCity |
Spinkahaven |
$randomCityImage |
http://no-a-valid-host/640/480/city |
$randomColor |
fuchsia |
$randomCommonFileExt |
wav |
$randomCommonFileName |
well_modulated.mpg4 |
$randomCommonFileType |
audio |
$randomCompanyName |
Grady LLC |
$randomCompanySuffix |
Inc |
$randomCountry |
Kazakhstan |
$randomCountryCode |
MD |
$randomCreditCardMask |
3622 |
$randomCurrencyCode |
ZMK |
$randomCurrencyName |
Pound Sterling |
$randomCurrencySymbol |
£ |
$randomDatabaseCollation |
utf8_general_ci |
$randomDatabaseColumn |
updatedAt |
$randomDatabaseEngine |
Memory |
$randomDatabaseType |
text |
$randomDateFuture |
Tue Mar 17 2020 13:11:50 GMT+0530 (India Standard Time) |
$randomDatePast |
Sat Mar 02 2019 09:09:26 GMT+0530 (India Standard Time) |
$randomDateRecent |
Tue Jul 09 2019 23:12:37 GMT+0530 (India Standard Time) |
$randomDepartment |
Electronics |
$randomDirectoryPath |
/usr/local/bin |
$randomDomainName |
trevor.info |
$randomDomainSuffix |
org |
$randomDomainWord |
jaden |
$randomEmail |
Iva.Kovacek61@no-a-valid-host.com |
$randomExampleEmail |
non-a-valid-user@example.net |
$randomFashionImage |
http://no-a-valid-host/640/480/fashion |
$randomFileExt |
war |
$randomFileName |
neural_sri_lanka_rupee_gloves.gdoc |
$randomFilePath |
/home/programming_chicken.cpio |
$randomFileType |
application |
$randomFirstName |
Chandler |
$randomFoodImage |
http://no-a-valid-host/640/480/food |
$randomFullName |
Connie Runolfsdottir |
$randomHexColor |
#47594a |
$randomImageDataUri |
data:image/svg+xml;charset=UTF-8,%3Csvg%20xmlns%3D%22http%3A%2F%2Fwww.w3.org%2F2000%2Fsvg%22%20version%3D%221.1%22%20baseProfile%3D%22full%22%20width%3D%22undefined%22%20height%3D%22undefined%22%3E%20%3Crect%20width%3D%22100%25%22%20height%3D%22100%25%22%20fill%3D%22grey%22%2F%3E%20%20%3Ctext%20x%3D%220%22%20y%3D%2220%22%20font-size%3D%2220%22%20text-anchor%3D%22start%22%20fill%3D%22white%22%3Eundefinedxundefined%3C%2Ftext%3E%20%3C%2Fsvg%3E |
$randomImageUrl |
http://no-a-valid-host/640/480 |
$randomIngverb |
navigating |
$randomInt |
494 |
$randomIP |
241.102.234.100 |
$randomIPV6 |
dbe2:7ae6:119b:c161:1560:6dda:3a9b:90a9 |
$randomJobArea |
Mobility |
$randomJobDescriptor |
Senior |
$randomJobTitle |
International Creative Liaison |
$randomJobType |
Supervisor |
$randomLastName |
Schneider |
$randomLatitude |
55.2099 |
$randomLocale |
ny |
$randomLongitude |
40.6609 |
$randomLoremLines |
Ducimus in ut mollitia.\nA itaque non.\nHarum temporibus nihil voluptas.\nIste in sed et nesciunt in quaerat sed. |
$randomLoremParagraph |
Ab aliquid odio iste quo voluptas voluptatem dignissimos velit. Recusandae facilis qui commodi ea magnam enim nostrum quia quis. Nihil est suscipit assumenda ut voluptatem sed. Esse ab voluptas odit qui molestiae. Rem est nesciunt est quis ipsam expedita consequuntur. |
$randomLoremParagraphs |
Voluptatem rem magnam aliquam ab id aut quaerat. Placeat provident possimus voluptatibus dicta velit non aut quasi. Mollitia et aliquam expedita sunt dolores nam consequuntur. Nam dolorum delectus ipsam repudiandae et ipsam ut voluptatum totam. Nobis labore labore recusandae ipsam quo. |
$randomLoremSentence |
Molestias consequuntur nisi non quod. |
$randomLoremSentences |
Et sint voluptas similique iure amet perspiciatis vero sequi atque. Ut porro sit et hic. Neque aspernatur vitae fugiat ut dolore et veritatis. Ab iusto ex delectus animi. Voluptates nisi iusto. Impedit quod quae voluptate qui. |
$randomLoremSlug |
eos-aperiam-accusamus, beatae-id-molestiae, qui-est-repellat |
$randomLoremText |
Quisquam asperiores exercitationem ut ipsum. Aut eius nesciunt. Et reiciendis aut alias eaque. Nihil amet laboriosam pariatur eligendi. Sunt ullam ut sint natus ducimus. Voluptas harum aspernatur soluta rem nam. |
$randomLoremWord |
est |
$randomLoremWords |
vel repellat nobis |
$randomMACAddress |
33:d4:68:5f:b4:c7 |
$randomMimeType |
audio/vnd.vmx.cvsd |
$randomMonth |
February |
$randomNamePrefix |
Dr. |
$randomNameSuffix |
MD |
$randomNatureImage |
http://no-a-valid-host/640/480/nature |
$randomNightlifeImage |
http://no-a-valid-host/640/480/nightlife |
$randomNoun |
bus |
$randomPassword |
t9iXe7COoDKv8k3 |
$randomPeopleImage |
http://no-a-valid-host/640/480/people |
$randomPhoneNumber |
700-008-5275 |
$randomPhoneNumberExt |
27-199-983-3864 |
$randomPhrase |
You can't program the monitor without navigating the mobile XML program! |
$randomPrice |
531.55 |
$randomProduct |
Pizza |
$randomProductAdjective |
Unbranded |
$randomProductMaterial |
Steel |
$randomProductName |
Handmade Concrete Tuna |
$randomProtocol |
https |
$randomSemver |
7.0.5 |
$randomSportsImage |
http://no-a-valid-host/640/480/sports |
$randomStreetAddress |
5742 Harvey Streets |
$randomStreetName |
Kuhic Island |
$randomTransactionType |
payment |
$randomTransportImage |
http://no-a-valid-host/640/480/transport |
$randomUrl |
https://no-a-valid-host.net |
$randomUserAgent |
Mozilla/5.0 (Macintosh; U; Intel Mac OS X 10.9.8; rv:15.6) Gecko/20100101 Firefox/15.6.6 |
$randomUserName |
Jarrell.Gutkowski |
$randomUUID |
6929bb52-3ab2-448a-9796-d6480ecad36b |
$randomVerb |
navigate |
$randomWeekday |
Thursday |
$randomWord |
withdrawal |
$randomWords |
Samoa Synergistic sticky copying Grocery |
$timestamp |
1562757107 |
Example: Global Scope
In this example, the global scope is exported from the Postman Client as global-scope.json and provided to API Fuzzing through the FUZZAPI_POSTMAN_COLLECTION_VARIABLES configuration variable.
Here is an example of using FUZZAPI_POSTMAN_COLLECTION_VARIABLES:
stages:
- fuzz
include:
- template: API-Fuzzing.gitlab-ci.yml
variables:
FUZZAPI_PROFILE: Quick-10
FUZZAPI_POSTMAN_COLLECTION: postman-collection.json
FUZZAPI_POSTMAN_COLLECTION_VARIABLES: global-scope.json
FUZZAPI_TARGET_URL: http://test-deployment/Example: Environment Scope
In this example, the environment scope is exported from the Postman Client as environment-scope.json and provided to API Fuzzing through the FUZZAPI_POSTMAN_COLLECTION_VARIABLES configuration variable.
Here is an example of using FUZZAPI_POSTMAN_COLLECTION_VARIABLES:
stages:
- fuzz
include:
- template: API-Fuzzing.gitlab-ci.yml
variables:
FUZZAPI_PROFILE: Quick
FUZZAPI_POSTMAN_COLLECTION: postman-collection.json
FUZZAPI_POSTMAN_COLLECTION_VARIABLES: environment-scope.json
FUZZAPI_TARGET_URL: http://test-deployment/Example: Collection Scope
The collection scope variables are included in the exported Postman Collection file and provided through the FUZZAPI_POSTMAN_COLLECTION configuration variable.
Here is an example of using FUZZAPI_POSTMAN_COLLECTION:
stages:
- fuzz
include:
- template: API-Fuzzing.gitlab-ci.yml
variables:
FUZZAPI_PROFILE: Quick
FUZZAPI_POSTMAN_COLLECTION: postman-collection.json
FUZZAPI_TARGET_URL: http://test-deployment/
FUZZAPI_POSTMAN_COLLECTION_VARIABLES: variable-collection-dictionary.jsonExample: API Fuzzing Scope
The API Fuzzing Scope is used for two main purposes, defining data and local scope variables that are not supported by API Fuzzing, and changing the value of an existing variable defined in another scope. The API Fuzzing Scope is provided through the FUZZAPI_POSTMAN_COLLECTION_VARIABLES configuration variable.
Here is an example of using FUZZAPI_POSTMAN_COLLECTION_VARIABLES:
stages:
- fuzz
include:
- template: API-Fuzzing.gitlab-ci.yml
variables:
FUZZAPI_PROFILE: Quick
FUZZAPI_POSTMAN_COLLECTION: postman-collection.json
FUZZAPI_POSTMAN_COLLECTION_VARIABLES: api-fuzzing-scope.json
FUZZAPI_TARGET_URL: http://test-deployment/The file api-fuzzing-scope.json uses our custom JSON file format. This JSON is an object with key-value pairs for properties. The keys are the variables' names, and the values are the variables'
values. For example:
{
"base_url": "http://127.0.0.1/",
"token": "Token 84816165151"
}Example: Multiple Scopes
In this example, a global scope, environment scope, and collection scope are configured. The first step is to export our various scopes.
-
Export the global scope as
global-scope.json -
Export the environment scope as
environment-scope.json - Export the Postman Collection which includes the collection scope as
postman-collection.json
The Postman Collection is provided using the FUZZAPI_POSTMAN_COLLECTION variable, while the other scopes are provided using the FUZZAPI_POSTMAN_COLLECTION_VARIABLES. API Fuzzing can identify which scope the provided files match using data provided in each file.
stages:
- fuzz
include:
- template: API-Fuzzing.gitlab-ci.yml
variables:
FUZZAPI_PROFILE: Quick
FUZZAPI_POSTMAN_COLLECTION: postman-collection.json
FUZZAPI_POSTMAN_COLLECTION_VARIABLES: global-scope.json,environment-scope.json
FUZZAPI_TARGET_URL: http://test-deployment/Example: Changing a Variables Value
When using exported scopes, it's often the case that the value of a variable must be changed for use with API Fuzzing. For example, a collection scoped variable might contain a variable named api_version with a value of v2, while your test needs a value of v1. Instead of modifying the exported collection to change the value, the API Fuzzing scope can be used to change its value. This works because the API Fuzzing scope takes precedence over all other scopes.
The collection scope variables are included in the exported Postman Collection file and provided through the FUZZAPI_POSTMAN_COLLECTION configuration variable.
The API Fuzzing Scope is provided through the FUZZAPI_POSTMAN_COLLECTION_VARIABLES configuration variable, but first, we must create the file.
The file api-fuzzing-scope.json uses our custom JSON file format. This JSON is an object with key-value pairs for properties. The keys are the variables' names, and the values are the variables'
values. For example:
{
"api_version": "v1"
}Our CI definition:
stages:
- fuzz
include:
- template: API-Fuzzing.gitlab-ci.yml
variables:
FUZZAPI_PROFILE: Quick
FUZZAPI_POSTMAN_COLLECTION: postman-collection.json
FUZZAPI_POSTMAN_COLLECTION_VARIABLES: api-fuzzing-scope.json
FUZZAPI_TARGET_URL: http://test-deployment/Example: Changing a Variables Value with Multiple Scopes
When using exported scopes, it's often the case that the value of a variable must be changed for use with API Fuzzing. For example, an environment scope might contain a variable named api_version with a value of v2, while your test needs a value of v1. Instead of modifying the exported file to change the value, the API Fuzzing scope can be used. This works because the API Fuzzing scope takes precedence over all other scopes.
In this example, a global scope, environment scope, collection scope, and API Fuzzing scope are configured. The first step is to export and create our various scopes.
-
Export the global scope as
global-scope.json -
Export the environment scope as
environment-scope.json - Export the Postman Collection which includes the collection scope as
postman-collection.json
The API Fuzzing scope is used by creating a file api-fuzzing-scope.json using our custom JSON file format. This JSON is an object with key-value pairs for properties. The keys are the variables' names, and the values are the variables'
values. For example:
{
"api_version": "v1"
}The Postman Collection is provided using the FUZZAPI_POSTMAN_COLLECTION variable, while the other scopes are provided using the FUZZAPI_POSTMAN_COLLECTION_VARIABLES. API Fuzzing can identify which scope the provided files match using data provided in each file.
stages:
- fuzz
include:
- template: API-Fuzzing.gitlab-ci.yml
variables:
FUZZAPI_PROFILE: Quick
FUZZAPI_POSTMAN_COLLECTION: postman-collection.json
FUZZAPI_POSTMAN_COLLECTION_VARIABLES: global-scope.json,environment-scope.json,api-fuzzing-scope.json
FUZZAPI_TARGET_URL: http://test-deployment/API fuzzing configuration
The API fuzzing behavior can be changed through CI/CD variables.
From GitLab 13.12 and later, the default API fuzzing configuration file is .gitlab/gitlab-api-fuzzing-config.yml. In GitLab 14.0 and later, API fuzzing configuration files must be in your repository's
.gitlab directory instead of your repository's root.
WARNING: All customization of GitLab security scanning tools should be tested in a merge request before merging these changes to the default branch. Failure to do so can give unexpected results, including a large number of false positives.
Authentication
Authentication is handled by providing the authentication token as a header or cookie. You can provide a script that performs an authentication flow or calculates the token.
HTTP Basic Authentication
HTTP basic authentication is an authentication method built into the HTTP protocol and used in conjunction with transport layer security (TLS).
We recommended that you create a CI/CD variable
for the password (for example, TEST_API_PASSWORD), and set it to be masked. You can create CI/CD
variables from the GitLab project's page at Settings > CI/CD, in the Variables section.
Because of the limitations on masked variables,
you should Base64-encode the password before adding it as a variable.
Finally, add two CI/CD variables to your .gitlab-ci.yml file:
-
FUZZAPI_HTTP_USERNAME: The username for authentication. -
FUZZAPI_HTTP_PASSWORD_BASE64: The Base64-encoded password for authentication.
stages:
- fuzz
include:
- template: API-Fuzzing.gitlab-ci.yml
variables:
FUZZAPI_PROFILE: Quick-10
FUZZAPI_HAR: test-api-recording.har
FUZZAPI_TARGET_URL: http://test-deployment/
FUZZAPI_HTTP_USERNAME: testuser
FUZZAPI_HTTP_PASSWORD_BASE64: $TEST_API_PASSWORDRaw password
If you do not want to Base64-encode the password (or if you are using GitLab 15.3 or earlier) you can provide the raw password FUZZAPI_HTTP_PASSWORD, instead of using FUZZAPI_HTTP_PASSWORD_BASE64.
Bearer Tokens
Bearer tokens are used by several different authentication mechanisms, including OAuth2 and JSON Web
Tokens (JWT). Bearer tokens are transmitted using the Authorization HTTP header. To use bearer
tokens with API fuzzing, you need one of the following:
- A token that doesn't expire
- A way to generate a token that lasts the length of testing
- A Python script that API fuzzing can call to generate the token
Token doesn't expire
If the bearer token doesn't expire, use the FUZZAPI_OVERRIDES_ENV variable to provide it. This
variable's content is a JSON snippet that provides headers and cookies to add to API fuzzing's
outgoing HTTP requests.
Follow these steps to provide the bearer token with FUZZAPI_OVERRIDES_ENV:
-
Create a CI/CD variable, for example
TEST_API_BEARERAUTH, with the value{"headers":{"Authorization":"Bearer dXNlcm5hbWU6cGFzc3dvcmQ="}}(substitute your token). You can create CI/CD variables from the GitLab projects page at Settings > CI/CD, in the Variables section. -
In your
.gitlab-ci.ymlfile, setFUZZAPI_OVERRIDES_ENVto the variable you just created:stages: - fuzz include: - template: API-Fuzzing.gitlab-ci.yml variables: FUZZAPI_PROFILE: Quick-10 FUZZAPI_OPENAPI: test-api-specification.json FUZZAPI_TARGET_URL: http://test-deployment/ FUZZAPI_OVERRIDES_ENV: $TEST_API_BEARERAUTH -
To validate that authentication is working, run an API fuzzing test and review the fuzzing logs and the test API's application logs. See the overrides section for more information about override commands.
Token generated at test runtime
If the bearer token must be generated and doesn't expire during testing, you can provide to API fuzzing with a file containing the token. A prior stage and job, or part of the API fuzzing job, can generate this file.
API fuzzing expects to receive a JSON file with the following structure:
{
"headers" : {
"Authorization" : "Bearer dXNlcm5hbWU6cGFzc3dvcmQ="
}
}This file can be generated by a prior stage and provided to API fuzzing through the
FUZZAPI_OVERRIDES_FILE CI/CD variable.
Set FUZZAPI_OVERRIDES_FILE in your .gitlab-ci.yml file:
stages:
- fuzz
include:
- template: API-Fuzzing.gitlab-ci.yml
variables:
FUZZAPI_PROFILE: Quick
FUZZAPI_OPENAPI: test-api-specification.json
FUZZAPI_TARGET_URL: http://test-deployment/
FUZZAPI_OVERRIDES_FILE: api-fuzzing-overrides.jsonTo validate that authentication is working, run an API fuzzing test and review the fuzzing logs and the test API's application logs.
Token has short expiration
If the bearer token must be generated and expires prior to the scan's completion, you can provide a program or script for the API fuzzer to execute on a provided interval. The provided script runs in an Alpine Linux container that has Python 3 and Bash installed. If the Python script requires additional packages, it must detect this and install the packages at runtime.
The script must create a JSON file containing the bearer token in a specific format:
{
"headers" : {
"Authorization" : "Bearer dXNlcm5hbWU6cGFzc3dvcmQ="
}
}You must provide three CI/CD variables, each set for correct operation:
-
FUZZAPI_OVERRIDES_FILE: JSON file the provided command generates. -
FUZZAPI_OVERRIDES_CMD: Command that generates the JSON file. -
FUZZAPI_OVERRIDES_INTERVAL: Interval (in seconds) to run command.
For example:
stages:
  - fuzz

include:
  - template: API-Fuzzing.gitlab-ci.yml

variables:
  FUZZAPI_PROFILE: Quick-10
  FUZZAPI_OPENAPI: test-api-specification.json
  FUZZAPI_TARGET_URL: http://test-deployment/
FUZZAPI_OVERRIDES_FILE: api-fuzzing-overrides.json
FUZZAPI_OVERRIDES_CMD: renew_token.py
FUZZAPI_OVERRIDES_INTERVAL: 300To validate that authentication is working, run an API fuzzing test and review the fuzzing logs and the test API's application logs.
API fuzzing profiles
GitLab provides the configuration file
gitlab-api-fuzzing-config.yml.
It contains several testing profiles that perform a specific numbers of tests. The runtime of each
profile increases as the number of tests increases.
| Profile | Fuzz Tests (per parameter) |
|---|---|
| Quick-10 | 10 |
| Medium-20 | 20 |
| Medium-50 | 50 |
| Long-100 | 100 |
Available CI/CD variables
| CI/CD variable | Description |
|---|---|
SECURE_ANALYZERS_PREFIX |
Specify the Docker registry base address from which to download the analyzer. |
FUZZAPI_VERSION |
Specify API Fuzzing container version. Defaults to 2. |
FUZZAPI_IMAGE_SUFFIX |
Specify a container image suffix. Defaults to none. |
FUZZAPI_API_PORT |
Specify the communication port number used by API Fuzzing engine. Defaults to 5500. Introduced in GitLab 15.5. |
FUZZAPI_TARGET_URL |
Base URL of API testing target. |
FUZZAPI_CONFIG |
Deprecated in GitLab 13.12, replaced with default .gitlab/gitlab-api-fuzzing-config.yml. API Fuzzing configuration file. |
FUZZAPI_PROFILE |
Configuration profile to use during testing. Defaults to Quick-10. |
FUZZAPI_EXCLUDE_PATHS |
Exclude API URL paths from testing. |
FUZZAPI_EXCLUDE_URLS |
Exclude API URL from testing. Introduced in GitLab 14.10. |
FUZZAPI_EXCLUDE_PARAMETER_ENV |
JSON string containing excluded parameters. Introduced in GitLab 14.10. |
FUZZAPI_EXCLUDE_PARAMETER_FILE |
Path to a JSON file containing excluded parameters. Introduced in GitLab 14.10. |
FUZZAPI_OPENAPI |
OpenAPI Specification file or URL. |
FUZZAPI_OPENAPI_RELAXED_VALIDATION |
Relax document validation. Default is disabled. Introduced in GitLab 14.7. |
FUZZAPI_OPENAPI_ALL_MEDIA_TYPES |
Use all supported media types instead of one when generating requests. Causes test duration to be longer. Default is disabled. Introduced in GitLab 14.10. |
FUZZAPI_OPENAPI_MEDIA_TYPES |
Colon (:) separated media types accepted for testing. Default is disabled. Introduced in GitLab 14.10. |
FUZZAPI_HAR |
HTTP Archive (HAR) file. |
FUZZAPI_GRAPHQL |
Path to GraphQL endpoint, for example /api/graphql. Introduced in GitLab 15.4. |
FUZZAPI_GRAPHQL_SCHEMA |
A URL or filename for a GraphQL schema in JSON format. Introduced in GitLab 15.4. |
FUZZAPI_POSTMAN_COLLECTION |
Postman Collection file. |
FUZZAPI_POSTMAN_COLLECTION_VARIABLES |
Path to a JSON file to extract Postman variable values. The support for comma-separated (,) files was introduced in GitLab 15.1. |
FUZZAPI_OVERRIDES_FILE |
Path to a JSON file containing overrides. |
FUZZAPI_OVERRIDES_ENV |
JSON string containing headers to override. |
FUZZAPI_OVERRIDES_CMD |
Overrides command. |
FUZZAPI_OVERRIDES_CMD_VERBOSE |
When set to any value. It shows overrides command output as part of the job output. Introduced in GitLab 14.8. |
FUZZAPI_PRE_SCRIPT |
Run user command or script before scan session starts. |
FUZZAPI_POST_SCRIPT |
Run user command or script after scan session has finished. |
FUZZAPI_OVERRIDES_INTERVAL |
How often to run overrides command in seconds. Defaults to 0 (once). |
FUZZAPI_HTTP_USERNAME |
Username for HTTP authentication. |
FUZZAPI_HTTP_PASSWORD |
Password for HTTP authentication. |
FUZZAPI_HTTP_PASSWORD_BASE64 |
Password for HTTP authentication, Base64-encoded. Introduced in GitLab 15.4. |
Overrides
API Fuzzing provides a method to add or override specific items in your request, for example:
- Headers
- Cookies
- Query string
- Form data
- JSON nodes
- XML nodes
You can use this to inject semantic version headers, authentication, and so on. The authentication section includes examples of using overrides for that purpose.
Overrides use a JSON document, where each type of override is represented by a JSON object:
{
"headers": {
"header1": "value",
"header2": "value"
},
"cookies": {
"cookie1": "value",
"cookie2": "value"
},
"query": {
"query-string1": "value",
"query-string2": "value"
},
"body-form": {
"form-param1": "value",
"form-param2": "value"
},
"body-json": {
"json-path1": "value",
"json-path2": "value"
},
"body-xml" : {
"xpath1": "value",
"xpath2": "value"
}
}Example of setting a single header:
{
"headers": {
"Authorization": "Bearer dXNlcm5hbWU6cGFzc3dvcmQ="
}
}Example of setting both a header and cookie:
{
"headers": {
"Authorization": "Bearer dXNlcm5hbWU6cGFzc3dvcmQ="
},
"cookies": {
"flags": "677"
}
}Example usage for setting a body-form override:
{
"body-form": {
"username": "john.doe"
}
}The override engine uses body-form when the request body has only form-data content.
Example usage for setting a body-json override:
{
"body-json": {
"$.credentials.access-token": "iddqd!42.$"
}
}Each JSON property name in the object body-json is set to a JSON Path
expression. The JSON Path expression $.credentials.access-token identifies the node to be
overridden with the value iddqd!42.$. The override engine uses body-json when the request body
has only JSON content.
For example, if the body is set to the following JSON:
{
"credentials" : {
"username" :"john.doe",
"access-token" : "non-valid-password"
}
}It is changed to:
{
"credentials" : {
"username" :"john.doe",
"access-token" : "iddqd!42.$"
}
}Here's an example for setting a body-xml override. The first entry overrides an XML attribute and
the second entry overrides an XML element:
{
"body-xml" : {
"/credentials/@isEnabled": "true",
"/credentials/access-token/text()" : "iddqd!42.$"
}
}Each JSON property name in the object body-xml is set to an
XPath v2
expression. The XPath expression /credentials/@isEnabled identifies the attribute node to override
with the value true. The XPath expression /credentials/access-token/text() identifies the
element node to override with the value iddqd!42.$. The override engine uses body-xml when the
request body has only XML
content.
For example, if the body is set to the following XML:
<credentials isEnabled="false">
<username>john.doe</username>
<access-token>non-valid-password</access-token>
</credentials>It is changed to:
<credentials isEnabled="true">
<username>john.doe</username>
<access-token>iddqd!42.$</access-token>
</credentials>You can provide this JSON document as a file or environment variable. You may also provide a command to generate the JSON document. The command can run at intervals to support values that expire.
Using a file
To provide the overrides JSON as a file, the FUZZAPI_OVERRIDES_FILE CI/CD variable is set. The path is relative to the job current working directory.
Here's an example .gitlab-ci.yml:
stages:
- fuzz
include:
- template: API-Fuzzing.gitlab-ci.yml
variables:
FUZZAPI_PROFILE: Quick
FUZZAPI_OPENAPI: test-api-specification.json
FUZZAPI_TARGET_URL: http://test-deployment/
FUZZAPI_OVERRIDES_FILE: api-fuzzing-overrides.jsonUsing a CI/CD variable
To provide the overrides JSON as a CI/CD variable, use the FUZZAPI_OVERRIDES_ENV variable.
This allows you to place the JSON as variables that can be masked and protected.
In this example .gitlab-ci.yml, the FUZZAPI_OVERRIDES_ENV variable is set directly to the JSON:
stages:
- fuzz
include:
- template: API-Fuzzing.gitlab-ci.yml
variables:
FUZZAPI_PROFILE: Quick
FUZZAPI_OPENAPI: test-api-specification.json
FUZZAPI_TARGET_URL: http://test-deployment/
FUZZAPI_OVERRIDES_ENV: '{"headers":{"X-API-Version":"2"}}'In this example .gitlab-ci.yml, the SECRET_OVERRIDES variable provides the JSON. This is a
group or instance level CI/CD variable defined in the UI:
stages:
- fuzz
include:
- template: API-Fuzzing.gitlab-ci.yml
variables:
FUZZAPI_PROFILE: Quick
FUZZAPI_OPENAPI: test-api-specification.json
FUZZAPI_TARGET_URL: http://test-deployment/
FUZZAPI_OVERRIDES_ENV: $SECRET_OVERRIDESUsing a command
If the value must be generated or regenerated on expiration, you can provide a program or script for the API fuzzer to execute on a specified interval. The provided script runs in an Alpine Linux container that has Python 3 and Bash installed.
You have to set the environment variable FUZZAPI_OVERRIDES_CMD to the program or script you would like
to execute. The provided command creates the overrides JSON file as defined previously.
You might want to install other scripting runtimes like NodeJS or Ruby, or maybe you need to install a dependency for
your overrides command. In this case, we recommend setting the FUZZAPI_PRE_SCRIPT to the file path of a script which
provides those prerequisites. The script provided by FUZZAPI_PRE_SCRIPT is executed once, before the analyzer starts.
See the Alpine Linux package management page for information about installing Alpine Linux packages.
You must provide three CI/CD variables, each set for correct operation:
-
FUZZAPI_OVERRIDES_FILE: File generated by the provided command. -
FUZZAPI_OVERRIDES_CMD: Overrides command in charge of generating the overrides JSON file periodically. -
FUZZAPI_OVERRIDES_INTERVAL: Interval in seconds to run command.
Optionally:
-
FUZZAPI_PRE_SCRIPT: Script to install runtimes or dependencies before the analyzer starts.
WARNING:
To execute scripts in Alpine Linux you must first use the command chmod to set the execution permission. For example, to set the execution permission of script.py for everyone, use the command: chmod a+x script.py. If needed, you can version your script.py with the execution permission already set.
stages:
- fuzz
include:
- template: API-Fuzzing.gitlab-ci.yml
variables:
FUZZAPI_PROFILE: Quick
FUZZAPI_OPENAPI: test-api-specification.json
FUZZAPI_TARGET_URL: http://test-deployment/
FUZZAPI_OVERRIDES_FILE: api-fuzzing-overrides.json
FUZZAPI_OVERRIDES_CMD: renew_token.py
FUZZAPI_OVERRIDES_INTERVAL: 300Debugging overrides
Introduced in GitLab 14.8.
By default the output of the overrides command is hidden. If the overrides command returns a non zero exit code, the command is displayed as part of your job output. Optionally, you can set the variable FUZZAPI_OVERRIDES_CMD_VERBOSE to any value to display overrides command output as it is generated. This is useful when testing your overrides script, but should be disabled afterwards as it slows down testing.
It is also possible to write messages from your script to a log file that is collected when the job completes or fails. The log file must be created in a specific location and follow a naming convention.
Adding some basic logging to your overrides script is useful in case the script fails unexpectedly during typical running of the job. The log file is automatically included as an artifact of the job, allowing you to download it after the job has finished.
Following our example, we provided renew_token.py in the environmental variable FUZZAPI_OVERRIDES_CMD. Notice two things in the script:
- Log file is saved in the location indicated by the environment variable
CI_PROJECT_DIR. - Log filename should match
gl-*.log.
#!/usr/bin/env python
# Example of an overrides command
# Override commands can update the overrides json file
# with new values to be used. This is a great way to
# update an authentication token that will expire
# during testing.
import logging
import json
import os
import requests
import backoff
# [1] Store log file in directory indicated by env var CI_PROJECT_DIR
working_directory = os.environ.get( 'CI_PROJECT_DIR')
overrides_file_name = os.environ.get('FUZZAPI_OVERRIDES_FILE', 'api-fuzzing-overrides.json')
overrides_file_path = os.path.join(working_directory, overrides_file_name)
# [2] File name should match the pattern: gl-*.log
log_file_path = os.path.join(working_directory, 'gl-user-overrides.log')
# Set up logger
logging.basicConfig(filename=log_file_path, level=logging.DEBUG)
# Use `backoff` decorator to retry in case of transient errors.
@backoff.on_exception(backoff.expo,
(requests.exceptions.Timeout,
requests.exceptions.ConnectionError),
max_time=30)
def get_auth_response():
authorization_url = 'https://authorization.service/api/get_api_token'
return requests.get(
f'{authorization_url}',
auth=(os.environ.get('AUTH_USER'), os.environ.get('AUTH_PWD'))
)
# In our example, access token is retrieved from a given endpoint
try:
# Performs a http request, response sample:
# { "Token" : "b5638ae7-6e77-4585-b035-7d9de2e3f6b3" }
response = get_auth_response()
# Check that the request is successful. may raise `requests.exceptions.HTTPError`
response.raise_for_status()
# Gets JSON data
response_body = response.json()
# If needed specific exceptions can be caught
# requests.ConnectionError : A network connection error problem occurred
# requests.HTTPError : HTTP request returned an unsuccessful status code. [Response.raise_for_status()]
# requests.ConnectTimeout : The request timed out while trying to connect to the remote server
# requests.ReadTimeout : The server did not send any data in the allotted amount of time.
# requests.TooManyRedirects : The request exceeds the configured number of maximum redirections
# requests.exceptions.RequestException : All exceptions that related to Requests
except json.JSONDecodeError as json_decode_error:
# logs errors related decoding JSON response
logging.error(f'Error, failed while decoding JSON response. Error message: {json_decode_error}')
raise
except requests.exceptions.RequestException as requests_error:
# logs exceptions related to `Requests`
logging.error(f'Error, failed while performing HTTP request. Error message: {requests_error}')
raise
except Exception as e:
# logs any other error
logging.error(f'Error, unknown error while retrieving access token. Error message: {e}')
raise
# computes object that holds overrides file content.
# It uses data fetched from request
overrides_data = {
"headers": {
"Authorization": f"Token {response_body['Token']}"
}
}
# log entry informing about the file override computation
logging.info("Creating overrides file: %s" % overrides_file_path)
# attempts to overwrite the file
try:
if os.path.exists(overrides_file_path):
os.unlink(overrides_file_path)
# overwrites the file with our updated dictionary
with open(overrides_file_path, "wb+") as fd:
fd.write(json.dumps(overrides_data).encode('utf-8'))
except Exception as e:
# logs any other error
logging.error(f'Error, unknown error when overwriting file {overrides_file_path}. Error message: {e}')
raise
# logs informing override has finished successfully
logging.info("Override file has been updated")
# endIn the overrides command example, the Python script depends on the backoff library. To make sure the library is installed before executing the Python script, the FUZZAPI_PRE_SCRIPT is set to a script that installs the dependencies of your overrides command.
As for example, the following script user-pre-scan-set-up.sh:
#!/bin/bash
# user-pre-scan-set-up.sh
# Ensures python dependencies are installed
echo "**** install python dependencies ****"
python3 -m ensurepip
pip3 install --no-cache --upgrade \
pip \
requests \
backoff
echo "**** python dependencies installed ****"
# endYou have to update your configuration to set the FUZZAPI_PRE_SCRIPT to our new user-pre-scan-set-up.sh script. For example:
stages:
- fuzz
include:
- template: API-Fuzzing.gitlab-ci.yml
variables:
FUZZAPI_PROFILE: Quick
FUZZAPI_OPENAPI: test-api-specification.json
FUZZAPI_TARGET_URL: http://test-deployment/
FUZZAPI_PRE_SCRIPT: user-pre-scan-set-up.sh
FUZZAPI_OVERRIDES_FILE: api-fuzzing-overrides.json
FUZZAPI_OVERRIDES_CMD: renew_token.py
FUZZAPI_OVERRIDES_INTERVAL: 300In the previous sample, you could use the script user-pre-scan-set-up.sh to also install new runtimes or applications that later on you could use in your overrides command.
Exclude Paths
Introduced in GitLab 14.0.
When testing an API it can be useful to exclude certain paths. For example, you might exclude testing of an authentication service or an older version of the API. To exclude paths, use the FUZZAPI_EXCLUDE_PATHS CI/CD variable . This variable is specified in your .gitlab-ci.yml file. To exclude multiple paths, separate entries using the ; character. In the provided paths you can use a single character wildcard ? and * for a multiple character wildcard.
To verify the paths are excluded, review the Tested Operations and Excluded Operations portion of the job output. You should not see any excluded paths listed under Tested Operations.
2021-05-27 21:51:08 [INF] API Fuzzing: --[ Tested Operations ]-------------------------
2021-05-27 21:51:08 [INF] API Fuzzing: 201 POST http://target:7777/api/users CREATED
2021-05-27 21:51:08 [INF] API Fuzzing: ------------------------------------------------
2021-05-27 21:51:08 [INF] API Fuzzing: --[ Excluded Operations ]-----------------------
2021-05-27 21:51:08 [INF] API Fuzzing: GET http://target:7777/api/messages
2021-05-27 21:51:08 [INF] API Fuzzing: POST http://target:7777/api/messages
2021-05-27 21:51:08 [INF] API Fuzzing: ------------------------------------------------Examples of excluding paths
This example excludes the /auth resource. This does not exclude child resources (/auth/child).
variables:
FUZZAPI_EXCLUDE_PATHS: /authTo exclude /auth, and child resources (/auth/child), we use a wildcard.
variables:
FUZZAPI_EXCLUDE_PATHS: /auth*To exclude multiple paths we can use the ; character. In this example we exclude /auth* and /v1/*.
variables:
FUZZAPI_EXCLUDE_PATHS: /auth*;/v1/*Exclude parameters
Introduced in GitLab 14.10.
While testing an API you may might want to exclude a parameter (query string, header, or body element) from testing. This may be needed because a parameter always causes a failure, slows down testing, or for other reasons. To exclude parameters you can use one of the following variables: FUZZAPI_EXCLUDE_PARAMETER_ENV or FUZZAPI_EXCLUDE_PARAMETER_FILE.
The FUZZAPI_EXCLUDE_PARAMETER_ENV allows providing a JSON string containing excluded parameters. This is a good option if the JSON is short and can not often change. Another option is the variable FUZZAPI_EXCLUDE_PARAMETER_FILE. This variable is set to a file path that can be checked into the repository, created by another job as an artifact, or generated at runtime from a pre-script using FUZZAPI_PRE_SCRIPT.
Exclude parameters using a JSON document
The JSON document contains a JSON object which uses specific properties to identify which parameter should be excluded. You can provide the following properties to exclude specific parameters during the scanning process:
-
headers: Use this property to exclude specific headers. The property's value is an array of header names to be excluded. Names are case-insensitive. -
cookies: Use this property's value to exclude specific cookies. The property's value is an array of cookie names to be excluded. Names are case-sensitive. -
query: Use this property to exclude specific fields from the query string. The property's value is an array of field names from the query string to be excluded. Names are case-sensitive. -
body-form: Use this property to exclude specific fields from a request that uses the media typeapplication/x-www-form-urlencoded. The property's value is an array of the field names from the body to be excluded. Names are case-sensitive. -
body-json: Use this property to exclude specific JSON nodes from a request that uses the media typeapplication/json. The property's value is an array, each entry of the array is a JSON Path expression. -
body-xml: Use this property to exclude specific XML nodes from a request that uses media typeapplication/xml. The property's value is an array, each entry of the array is a XPath v2 expression.
The following JSON document is an example of the expected structure to exclude parameters.
{
"headers": [
"header1",
"header2"
],
"cookies": [
"cookie1",
"cookie2"
],
"query": [
"query-string1",
"query-string2"
],
"body-form": [
"form-param1",
"form-param2"
],
"body-json": [
"json-path-expression-1",
"json-path-expression-2"
],
"body-xml" : [
"xpath-expression-1",
"xpath-expression-2"
]
}Examples
Excluding a single header
To exclude the header Upgrade-Insecure-Requests, set the header property's value to an array with the header name: [ "Upgrade-Insecure-Requests" ]. For instance, the JSON document looks like this:
{
"headers": [ "Upgrade-Insecure-Requests" ]
}Header names are case-insensitive, thus the header name UPGRADE-INSECURE-REQUESTS is equivalent to Upgrade-Insecure-Requests.
Excluding both a header and two cookies
To exclude the header Authorization and the cookies PHPSESSID and csrftoken, set the headers property's value to an array with header name [ "Authorization" ] and the cookies property's value to an array with the cookies' names [ "PHPSESSID", "csrftoken" ]. For instance, the JSON document looks like this:
{
"headers": [ "Authorization" ],
"cookies": [ "PHPSESSID", "csrftoken" ]
}
Excluding a body-form parameter
To exclude the password field in a request that uses application/x-www-form-urlencoded, set the body-form property's value to an array with the field name [ "password" ]. For instance, the JSON document looks like this:
{
"body-form": [ "password" ]
}The exclude parameters uses body-form when the request uses a content type application/x-www-form-urlencoded.
Excluding a specific JSON nodes using JSON Path
To exclude the schema property in the root object, set the body-json property's value to an array with the JSON Path expression [ "$.schema" ].
The JSON Path expression uses special syntax to identify JSON nodes: $ refers to the root of the JSON document, . refers to the current object (in our case the root object), and the text schema refers to a property name. Thus, the JSON path expression $.schema refers to a property schema in the root object.
For instance, the JSON document looks like this:
{
"body-json": [ "$.schema" ]
}The exclude parameters uses body-json when the request uses a content type application/json. Each entry in body-json is expected to be a JSON Path expression. In JSON Path, characters like $, *, . among others have special meaning.
Excluding multiple JSON nodes using JSON Path
To exclude the property password on each entry of an array of users at the root level, set the body-json property's value to an array with the JSON Path expression [ "$.users[*].paswword" ].
The JSON Path expression starts with $ to refer to the root node and uses . to refer to the current node. Then, it uses users to refer to a property and the characters [ and ] to enclose the index in the array you want to use, instead of providing a number as an index you use * to specify any index. After the index reference, we find . which now refers to any given selected index in the array, preceded by a property name password.
For instance, the JSON document looks like this:
{
"body-json": [ "$.users[*].paswword" ]
}The exclude parameters uses body-json when the request uses a content type application/json. Each entry in body-json is expected to be a JSON Path expression. In JSON Path characters like $, *, . among others have special meaning.
Excluding an XML attribute
To exclude an attribute named isEnabled located in the root element credentials, set the body-xml property's value to an array with the XPath expression [ "/credentials/@isEnabled" ].
The XPath expression /credentials/@isEnabled, starts with / to indicate the root of the XML document, then it is followed by the word credentials which indicates the name of the element to match. It uses a / to refer to a node of the previous XML element, and the character @ to indicate that the name isEnable is an attribute.
For instance, the JSON document looks like this:
{
"body-xml": [
"/credentials/@isEnabled"
]
}The exclude parameters uses body-xml when the request uses a content type application/xml. Each entry in body-xml is expected to be an XPath v2 expression. In XPath expressions, characters like @, /, :, [, ] among others have special meanings.
Excluding an XML element's text
To exclude the text of the username element contained in root node credentials, set the body-xml property's value to an array with the XPath expression [/credentials/username/text()" ].
In the XPath expression /credentials/username/text(), the first character / refers to the root XML node, and then after it indicates an XML element's name credentials. Similarly, the character / refers to the current element, followed by a new XML element's name username. Last part has a / that refers to the current element, and uses a XPath function called text() which identifies the text of the current element.
For instance, the JSON document looks like this:
{
"body-xml": [
"/credentials/username/text()"
]
}The exclude parameters uses body-xml when the request uses a content type application/xml. Each entry in body-xml is expected to be a XPath v2 expression. In XPath expressions characters like @, /, :, [, ] among others have special meanings.
Excluding an XML element
To exclude the element username contained in root node credentials, set the body-xml property's value to an array with the XPath expression [/credentials/username" ].
In the XPath expression /credentials/username, the first character / refers to the root XML node, and then after it indicates an XML element's name credentials. Similarly, the character / refers to the current element, followed by a new XML element's name username.
For instance, the JSON document looks like this:
{
"body-xml": [
"/credentials/username"
]
}The exclude parameters uses body-xml when the request uses a content type application/xml. Each entry in body-xml is expected to be a XPath v2 expression. In XPath expressions characters like @, /, :, [, ] among others have special meanings.
Excluding an XML node with namespaces
To exclude a XML element login which is defined in namespace s, and contained in credentials root node, set the body-xml property's value to an array with the XPath expression [ "/credentials/s:login" ].
In the XPath expression /credentials/s:login, the first character / refers to the root XML node, and then after it indicates an XML element's name credentials. Similarly, the character / refers to the current element, followed by a new XML element's name s:login. Notice that name contains the character :, this character separates the namespace from the node name.
The namespace name should have been defined in the XML document which is part of the body request. You may check the namespace in the specification document HAR, OpenAPI, or Postman Collection file.
{
"body-xml": [
"/credentials/s:login"
]
}The exclude parameters uses body-xml when the request uses a content type application/xml. Each entry in body-xml is expected to be a XPath v2 expression. In XPath expressions characters like @, /, :, [, ] among others have special meanings.
Using a JSON string
To provide the exclusion JSON document set the variable FUZZAPI_EXCLUDE_PARAMETER_ENV with the JSON string. In the following example, the .gitlab-ci.yml, the FUZZAPI_EXCLUDE_PARAMETER_ENV variable is set to a JSON string:
stages:
- fuzz
include:
- template: API-Fuzzing.gitlab-ci.yml
variables:
FUZZAPI_PROFILE: Quick
FUZZAPI_OPENAPI: test-api-specification.json
FUZZAPI_TARGET_URL: http://test-deployment/
FUZZAPI_EXCLUDE_PARAMETER_ENV: '{ "headers": [ "Upgrade-Insecure-Requests" ] }'Using a file
To provide the exclusion JSON document, set the variable FUZZAPI_EXCLUDE_PARAMETER_FILE with the JSON file path. The file path is relative to the job current working directory. In the following example .gitlab-ci.yml file, the FUZZAPI_EXCLUDE_PARAMETER_FILE variable is set to a JSON file path:
stages:
- fuzz
include:
- template: API-Fuzzing.gitlab-ci.yml
variables:
FUZZAPI_PROFILE: Quick
FUZZAPI_OPENAPI: test-api-specification.json
FUZZAPI_TARGET_URL: http://test-deployment/
FUZZAPI_EXCLUDE_PARAMETER_FILE: api-fuzzing-exclude-parameters.jsonThe api-fuzzing-exclude-parameters.json is a JSON document that follows the structure of exclude parameters document.
Exclude URLs
Introduced in GitLab 14.10.
As an alternative to excluding by paths, you can filter by any other component in the URL by using the FUZZAPI_EXCLUDE_URLS CI/CD variable. This variable can be set in your .gitlab-ci.yml file. The variable can store multiple values, separated by commas (,). Each value is a regular expression. Because each entry is a regular expression, an entry such as .* excludes all URLs because it is a regular expression that matches everything.
In your job output you can check if any URLs matched any provided regular expression from FUZZAPI_EXCLUDE_URLS. Matching operations are listed in the Excluded Operations section. Operations listed in the Excluded Operations should not be listed in the Tested Operations section. For example the following portion of a job output:
2021-05-27 21:51:08 [INF] API Fuzzing: --[ Tested Operations ]-------------------------
2021-05-27 21:51:08 [INF] API Fuzzing: 201 POST http://target:7777/api/users CREATED
2021-05-27 21:51:08 [INF] API Fuzzing: ------------------------------------------------
2021-05-27 21:51:08 [INF] API Fuzzing: --[ Excluded Operations ]-----------------------
2021-05-27 21:51:08 [INF] API Fuzzing: GET http://target:7777/api/messages
2021-05-27 21:51:08 [INF] API Fuzzing: POST http://target:7777/api/messages
2021-05-27 21:51:08 [INF] API Fuzzing: ------------------------------------------------NOTE:
Each value in FUZZAPI_EXCLUDE_URLS is a regular expression. Characters such as . , * and $ among many others have special meanings in regular expressions.
Examples
Excluding a URL and child resources
The following example excludes the URL http://target/api/auth and its child resources.
stages:
- fuzz
include:
- template: API-Fuzzing.gitlab-ci.yml
variables:
FUZZAPI_TARGET_URL: http://target/
FUZZAPI_OPENAPI: test-api-specification.json
FUZZAPI_EXCLUDE_URLS: http://target/api/authExcluding two URLs and allow their child resources
To exclude the URLs http://target/api/buy and http://target/api/sell but allowing to scan their child resources, for instance: http://target/api/buy/toy or http://target/api/sell/chair. You could use the value http://target/api/buy/$,http://target/api/sell/$. This value is using two regular expressions, each of them separated by a , character. Hence, it contains http://target/api/buy$ and http://target/api/sell$. In each regular expression, the trailing $ character points out where the matching URL should end.
stages:
- fuzz
include:
- template: API-Fuzzing.gitlab-ci.yml
variables:
FUZZAPI_TARGET_URL: http://target/
FUZZAPI_OPENAPI: test-api-specification.json
FUZZAPI_EXCLUDE_URLS: http://target/api/buy/$,http://target/api/sell/$Excluding two URLs and their child resources
To exclude the URLs: http://target/api/buy and http://target/api/sell, and their child resources. To provide multiple URLs we use the , character as follows:
stages:
- fuzz
include:
- template: API-Fuzzing.gitlab-ci.yml
variables:
FUZZAPI_TARGET_URL: http://target/
FUZZAPI_OPENAPI: test-api-specification.json
FUZZAPI_EXCLUDE_URLS: http://target/api/buy,http://target/api/sellExcluding URL using regular expressions
To exclude exactly https://target/api/v1/user/create and https://target/api/v2/user/create or any other version (v3,v4, and more), we could use https://target/api/v.*/user/create$. In the previous regular expression:
-
.indicates any character. -
*indicates zero or more times. -
$indicates that the URL should end there.
stages:
- fuzz
include:
- template: API-Fuzzing.gitlab-ci.yml
variables:
FUZZAPI_TARGET_URL: http://target/
FUZZAPI_OPENAPI: test-api-specification.json
FUZZAPI_EXCLUDE_URLS: https://target/api/v.*/user/create$Header Fuzzing
Header fuzzing is disabled by default due to the high number of false positives that occur with many technology stacks. When header fuzzing is enabled, you must specify a list of headers to include in fuzzing.
Each profile in the default configuration file has an entry for GeneralFuzzingCheck. This check
performs header fuzzing. Under the Configuration section, you must change the HeaderFuzzing and
Headers settings to enable header fuzzing.
This snippet shows the Quick-10 profile's default configuration with header fuzzing disabled:
- Name: Quick-10
DefaultProfile: Empty
Routes:
- Route: *Route0
Checks:
- Name: FormBodyFuzzingCheck
Configuration:
FuzzingCount: 10
UnicodeFuzzing: true
- Name: GeneralFuzzingCheck
Configuration:
FuzzingCount: 10
UnicodeFuzzing: true
HeaderFuzzing: false
Headers:
- Name: JsonFuzzingCheck
Configuration:
FuzzingCount: 10
UnicodeFuzzing: true
- Name: XmlFuzzingCheck
Configuration:
FuzzingCount: 10
UnicodeFuzzing: trueHeaderFuzzing is a boolean that turns header fuzzing on and off. The default setting is false
for off. To turn header fuzzing on, change this setting to true:
- Name: GeneralFuzzingCheck
Configuration:
FuzzingCount: 10
UnicodeFuzzing: true
HeaderFuzzing: true
Headers:Headers is a list of headers to fuzz. Only headers listed are fuzzed. To fuzz a header used by
your APIs, add an entry for it using the syntax - Name: HeaderName. For example, to fuzz a
custom header X-Custom, add - Name: X-Custom:
- Name: GeneralFuzzingCheck
Configuration:
FuzzingCount: 10
UnicodeFuzzing: true
HeaderFuzzing: true
Headers:
- Name: X-CustomYou now have a configuration to fuzz the header X-Custom. Use the same notation to list additional
headers:
- Name: GeneralFuzzingCheck
Configuration:
FuzzingCount: 10
UnicodeFuzzing: true
HeaderFuzzing: true
Headers:
- Name: X-Custom
- Name: X-AnotherHeaderRepeat this configuration for each profile as needed.
Running your first scan
When configured correctly, a CI/CD pipeline contains a fuzz stage and an apifuzzer_fuzz or
apifuzzer_fuzz_dnd job. The job only fails when an invalid configuration is provided. During
typical operation, the job always succeeds even if faults are identified during fuzz testing.
Faults are displayed on the Security pipeline tab with the suite name. When testing against the repositories default branch, the fuzzing faults are also shown on the Security and Compliance's Vulnerability Report page.
To prevent an excessive number of reported faults, the API fuzzing scanner limits the number of faults it reports.
Viewing fuzzing faults
The API Fuzzing analyzer produces a JSON report that is collected and used to populate the faults into GitLab vulnerability screens. Fuzzing faults show up as vulnerabilities with a severity of Unknown.
The faults that API fuzzing finds require manual investigation and aren't associated with a specific vulnerability type. They require investigation to determine if they are a security issue, and if they should be fixed. See handling false positives for information about configuration changes you can make to limit the number of false positives reported.
View details of an API Fuzzing vulnerability
Introduced in GitLab 13.7.
Faults detected by API Fuzzing occur in the live web application, and require manual investigation to determine if they are vulnerabilities. Fuzzing faults are included as vulnerabilities with a severity of Unknown. To facilitate investigation of the fuzzing faults, detailed information is provided about the HTTP messages sent and received along with a description of the modifications made.
Follow these steps to view details of a fuzzing fault:
-
You can view faults in a project, or a merge request:
- In a project, go to the project's Security and Compliance > Vulnerability Report page. This page shows all vulnerabilities from the default branch only.
- In a merge request, go the merge request's Security section and select the Expand button. API Fuzzing faults are available in a section labeled API Fuzzing detected N potential vulnerabilities. Select the title to display the fault details.
-
Select the fault's title to display the fault's details. The table below describes these details.
Field Description Description Description of the fault including what was modified. Project Namespace and project in which the vulnerability was detected. Method HTTP method used to detect the vulnerability. URL URL at which the vulnerability was detected. Request The HTTP request that caused the fault. Unmodified Response Response from an unmodified request. This is what a typical working response looks like. Actual Response Response received from fuzzed request. Evidence How we determined a fault occurred. Identifiers The fuzzing check used to find this fault. Severity Severity of the finding is always Unknown. Scanner Type Scanner used to perform testing.
Security Dashboard
Fuzzing faults show up as vulnerabilities with a severity of Unknown. The Security Dashboard is a good place to get an overview of all the security vulnerabilities in your groups, projects and pipelines. For more information, see the Security Dashboard documentation.
Interacting with the vulnerabilities
Fuzzing faults show up as vulnerabilities with a severity of Unknown. Once a fault is found, you can interact with it. Read more on how to address the vulnerabilities.
Handling False Positives
False positives can be handled in two ways:
- Turn off the Check producing the false positive. This prevents the check from generating any faults. Example checks are the JSON Fuzzing Check, and Form Body Fuzzing Check.
- Fuzzing checks have several methods of detecting when a fault is identified, called Asserts. Asserts can also be turned off and configured. For example, the API fuzzer by default uses HTTP status codes to help identify when something is a real issue. If an API returns a 500 error during testing, this creates a fault. This isn't always desired, as some frameworks return 500 errors often.
Turn off a Check
Checks perform testing of a specific type and can be turned on and off for specific configuration
profiles. The default configuration file defines several profiles that you
can use. The profile definition in the configuration file lists all the checks that are active
during a scan. To turn off a specific check, remove it from the profile definition in the
configuration file. The profiles are defined in the Profiles section of the configuration file.
Example profile definition:
Profiles:
- Name: Quick-10
DefaultProfile: Quick
Routes:
- Route: *Route0
Checks:
- Name: FormBodyFuzzingCheck
Configuration:
FuzzingCount: 10
UnicodeFuzzing: true
- Name: GeneralFuzzingCheck
Configuration:
FuzzingCount: 10
UnicodeFuzzing: true
- Name: JsonFuzzingCheck
Configuration:
FuzzingCount: 10
UnicodeFuzzing: true
- Name: XmlFuzzingCheck
Configuration:
FuzzingCount: 10
UnicodeFuzzing: trueTo turn off the General Fuzzing Check you can remove these lines:
- Name: GeneralFuzzingCheck
Configuration:
FuzzingCount: 10
UnicodeFuzzing: trueThis results in the following YAML:
- Name: Quick-10
DefaultProfile: Quick
Routes:
- Route: *Route0
Checks:
- Name: FormBodyFuzzingCheck
Configuration:
FuzzingCount: 10
UnicodeFuzzing: true
- Name: JsonFuzzingCheck
Configuration:
FuzzingCount: 10
UnicodeFuzzing: true
- Name: XmlFuzzingCheck
Configuration:
FuzzingCount: 10
UnicodeFuzzing: trueTurn off an Assertion for a Check
Assertions detect faults in tests produced by checks. Many checks support multiple Assertions such
as Log Analysis, Response Analysis, and Status Code. When a fault is found, the Assertion used is
provided. To identify which Assertions are on by default, see the Checks default configuration in
the configuration file. The section is called Checks.
This example shows the FormBody Fuzzing Check:
Checks:
- Name: FormBodyFuzzingCheck
Configuration:
FuzzingCount: 30
UnicodeFuzzing: true
Assertions:
- Name: LogAnalysisAssertion
- Name: ResponseAnalysisAssertion
- Name: StatusCodeAssertionHere you can see three Assertions are on by default. A common source of false positives is
StatusCodeAssertion. To turn it off, modify its configuration in the Profiles section. This
example provides only the other two Assertions (LogAnalysisAssertion,
ResponseAnalysisAssertion). This prevents FormBodyFuzzingCheck from using StatusCodeAssertion:
Profiles:
- Name: Quick-10
DefaultProfile: Quick
Routes:
- Route: *Route0
Checks:
- Name: FormBodyFuzzingCheck
Configuration:
FuzzingCount: 10
UnicodeFuzzing: true
Assertions:
- Name: LogAnalysisAssertion
- Name: ResponseAnalysisAssertion
- Name: GeneralFuzzingCheck
Configuration:
FuzzingCount: 10
UnicodeFuzzing: true
- Name: JsonFuzzingCheck
Configuration:
FuzzingCount: 10
UnicodeFuzzing: true
- Name: XmlInjectionCheck
Configuration:
FuzzingCount: 10
UnicodeFuzzing: trueRunning API fuzzing in an offline environment
For self-managed GitLab instances in an environment with limited, restricted, or intermittent access to external resources through the internet, some adjustments are required for the Web API Fuzz testing job to successfully run.
Steps:
- Host the Docker image in a local container registry.
- Set the
SECURE_ANALYZERS_PREFIXto the local container registry.
The Docker image for API Fuzzing must be pulled (downloaded) from the public registry and then pushed (imported) into a local registry. The GitLab container registry can be used to locally host the Docker image. This process can be performed using a special template. See loading Docker images onto your offline host for instructions.
Once the Docker image is hosted locally, the SECURE_ANALYZERS_PREFIX variable is set with the location of the local registry. The variable must be set such that concatenating /api-security:2 results in a valid image location.
For example, the below line sets a registry for the image registry.gitlab.com/security-products/api-security:2:
SECURE_ANALYZERS_PREFIX: "registry.gitlab.com/security-products"
NOTE:
Setting SECURE_ANALYZERS_PREFIX changes the Docker image registry location for all GitLab Secure templates.
For more information, see Offline environments.
Performance tuning and testing speed
Security tools that perform API fuzz testing, such as API Fuzzing, perform testing by sending requests to an instance of your running application. The requests are mutated by our fuzzing engine to trigger unexpected behavior that might exist in your application. The speed of an API fuzzing test depends on the following:
- How many requests per second can be sent to your application by our tooling
- How fast your application responds to requests
- How many requests must be sent to test the application
- How many operations your API is comprised of
- How many fields are in each operation (think JSON bodies, headers, query string, cookies, etc.)
If API Fuzzing testing job still takes longer than expected after following the advice in this performance guide, reach out to support for further assistance.
Diagnosing performance issues
The first step to resolving performance issues is to understand what is contributing to the slower-than-expected testing time. Some common issues we see are:
- API Fuzzing is running on a slow or single-CPU GitLab Runner (GitLab Shared Runners are single-CPU)
- The application deployed to a slow/single-CPU instance and is not able to keep up with the testing load
- The application contains a slow operation that impacts the overall test speed (> 1/2 second)
- The application contains an operation that returns a large amount of data (> 500K+)
- The application contains a large number of operations (> 40)
The application contains a slow operation that impacts the overall test speed (> 1/2 second)
The API Fuzzing job output contains helpful information about how fast we are testing, how fast each operation being tested responds, and summary information. Let's take a look at some sample output to see how it can be used in tracking down performance issues:
API Fuzzing: Loaded 10 operations from: assets/har-large-response/large_responses.har
API Fuzzing:
API Fuzzing: Testing operation [1/10]: 'GET http://target:7777/api/large_response_json'.
API Fuzzing: - Parameters: (Headers: 4, Query: 0, Body: 0)
API Fuzzing: - Request body size: 0 Bytes (0 bytes)
API Fuzzing:
API Fuzzing: Finished testing operation 'GET http://target:7777/api/large_response_json'.
API Fuzzing: - Excluded Parameters: (Headers: 0, Query: 0, Body: 0)
API Fuzzing: - Performed 767 requests
API Fuzzing: - Average response body size: 130 MB
API Fuzzing: - Average call time: 2 seconds and 82.69 milliseconds (2.082693 seconds)
API Fuzzing: - Time to complete: 14 minutes, 8 seconds and 788.36 milliseconds (848.788358 seconds)This job console output snippet starts by telling us how many operations were found (10), followed by notifications that testing has started on a specific operation and a summary of the operation has been completed. The summary is the most interesting part of this log output. In the summary, we can see that it took API Fuzzing 767 requests to fully test this operation and its related fields. We can also see that the average response time was 2 seconds and the time to complete was 14 minutes for this one operation.
An average response time of 2 seconds is a good initial indicator that this specific operation takes a long time to test. Further, we can see that the response body size is quite large. The large body size is the culprit here, transferring that much data on each request is what takes the majority of that 2 seconds.
For this issue, the team might decide to:
- Use a multi-CPU runner. Using a multi-CPU runner allows API Fuzzing to parallelize the work being performed. This helps lower the test time, but getting the test down under 10 minutes might still be problematic without moving to a high CPU machine due to how long the operation takes to test.
- Trade off between how many CPUs and cost.
- Exclude this operation from the API Fuzzing test. While this is the simplest, it has the downside of a gap in security test coverage.
- Exclude the operation from feature branch API Fuzzing tests, but include it in the default branch test.
- Split up the API Fuzzing testing into multiple jobs.
The likely solution is to use a combination of these solutions to reach an acceptable test time, assuming your team's requirements are in the 5-7 minute range.
Addressing performance issues
The following sections document various options for addressing performance issues for API Fuzzing:
- Using a multi-CPU Runner
- Excluding slow operations
- Splitting a test into multiple jobs
- Excluding operations in feature branches, but not default branch
Using a multi-CPU Runner
One of the easiest performance boosts can be achieved using a multi-CPU runner with API Fuzzing. This table shows statistics collected during benchmarking of a Java Spring Boot REST API. In this benchmark, the target and API Fuzzing share a single runner instance.
| CPU Count | Request per Second |
|---|---|
| 1 CPU (Shared Runner) | 75 |
| 4 CPU | 255 |
| 8 CPU | 400 |
As we can see from this table, increasing the CPU count of the runner can have a large impact on testing speed/performance.
To use a multi-CPU typically requires deploying a self-managed GitLab Runner onto a multi-CPU machine or cloud compute instance.
When multiple types of GitLab Runners are available for use, the various instances are commonly set up with tags that can be used in the job definition to select a type of runner.
Here is an example job definition for API Fuzzing that adds a tags section with the tag multi-cpu. The job automatically extends the job definition included through the API Fuzzing template.
apifuzzer_fuzz:
tags:
- multi-cpuTo verify that API Fuzzing can detect multiple CPUs in the runner, download the gl-api-security-scanner.log file from a completed job's artifacts. Search the file for the string Starting work item processor and inspect the reported max DOP (degree of parallelism). The max DOP should be greater than or equal to the number of CPUs assigned to the runner. The value is never lower than 2, even on single CPU runners, unless forced through a configuration variable. If the value reported is less than the number of CPUs assigned to the runner, then something is wrong with the runner deployment. If unable to identify the problem, open a ticket with support to assist.
Example log entry:
17:00:01.084 [INF] <Peach.Web.Core.Services.WebRunnerMachine> Starting work item processor with 2 max DOP
Excluding slow operations
In the case of one or two slow operations, the team might decide to skip testing the operations. Excluding the operation is done using the FUZZAPI_EXCLUDE_PATHS configuration variable as explained in this section.
In this example, we have an operation that returns a large amount of data. The operation is GET http://target:7777/api/large_response_json. To exclude it we provide the FUZZAPI_EXCLUDE_PATHS configuration variable with the path portion of our operation URL /api/large_response_json.
To verify the operation is excluded, run the API Fuzzing job and review the job console output. It includes a list of included and excluded operations at the end of the test.
apifuzzer_fuzz:
variables:
FUZZAPI_EXCLUDE_PATHS: /api/large_response_jsonExcluding operations from testing could allow some vulnerabilities to go undetected. {: .alert .alert-warning}
Splitting a test into multiple jobs
Splitting a test into multiple jobs is supported by API Fuzzing through the use of FUZZAPI_EXCLUDE_PATHS and FUZZAPI_EXCLUDE_URLS. When splitting a test up, a good pattern is to disable the apifuzzer_fuzz job and replace it with two jobs with identifying names. In this example we have two jobs, each job is testing a version of the API, so our names reflect that. However, this technique can be applied to any situation, not just with versions of an API.
The rules we are using in the apifuzzer_v1 and apifuzzer_v2 jobs are copied from the API Fuzzing template.
# Disable the main apifuzzer_fuzz job
apifuzzer_fuzz:
rules:
- if: $CI_COMMIT_BRANCH
when: never
apifuzzer_v1:
extends: apifuzzer_fuzz
variables:
FUZZAPI_EXCLUDE_PATHS: /api/v1/**
rules:
rules:
- if: $API_FUZZING_DISABLED
when: never
- if: $API_FUZZING_DISABLED_FOR_DEFAULT_BRANCH &&
$CI_DEFAULT_BRANCH == $CI_COMMIT_REF_NAME
when: never
- if: $CI_COMMIT_BRANCH &&
$CI_GITLAB_FIPS_MODE == "true"
variables:
FUZZAPI_IMAGE_SUFFIX: "-fips"
- if: $CI_COMMIT_BRANCH
apifuzzer_v2:
variables:
FUZZAPI_EXCLUDE_PATHS: /api/v2/**
rules:
rules:
- if: $API_FUZZING_DISABLED
when: never
- if: $API_FUZZING_DISABLED_FOR_DEFAULT_BRANCH &&
$CI_DEFAULT_BRANCH == $CI_COMMIT_REF_NAME
when: never
- if: $CI_COMMIT_BRANCH &&
$CI_GITLAB_FIPS_MODE == "true"
variables:
FUZZAPI_IMAGE_SUFFIX: "-fips"
- if: $CI_COMMIT_BRANCHExcluding operations in feature branches, but not default branch
In the case of one or two slow operations, the team might decide to skip testing the operations, or exclude them from feature branch tests, but include them for default branch tests. Excluding the operation is done using the FUZZAPI_EXCLUDE_PATHS configuration variable as explained in this section.
In this example, we have an operation that returns a large amount of data. The operation is GET http://target:7777/api/large_response_json. To exclude it we provide the FUZZAPI_EXCLUDE_PATHS configuration variable with the path portion of our operation URL /api/large_response_json. Our configuration disables the main apifuzzer_fuzz job and creates two new jobs apifuzzer_main and apifuzzer_branch. The apifuzzer_branch is set up to exclude the long operation and only run on non-default branches (for example, feature branches). The apifuzzer_main branch is set up to only execute on the default branch (main in this example). The apifuzzer_branch jobs run faster, allowing for quick development cycles, while the apifuzzer_main job which only runs on default branch builds, takes longer to run.
To verify the operation is excluded, run the API Fuzzing job and review the job console output. It includes a list of included and excluded operations at the end of the test.
# Disable the main job so we can create two jobs with
# different names
apifuzzer_fuzz:
rules:
- if: $CI_COMMIT_BRANCH
when: never
# API Fuzzing for feature branch work, excludes /api/large_response_json
apifuzzer_branch:
extends: apifuzzer_fuzz
variables:
FUZZAPI_EXCLUDE_PATHS: /api/large_response_json
rules:
rules:
- if: $API_FUZZING_DISABLED
when: never
- if: $API_FUZZING_DISABLED_FOR_DEFAULT_BRANCH &&
$CI_DEFAULT_BRANCH == $CI_COMMIT_REF_NAME
when: never
- if: $CI_COMMIT_BRANCH &&
$CI_GITLAB_FIPS_MODE == "true"
variables:
FUZZAPI_IMAGE_SUFFIX: "-fips"
- if: $CI_COMMIT_BRANCH == $CI_DEFAULT_BRANCH
when: never
- if: $CI_COMMIT_BRANCH
# API Fuzzing for default branch (main in our case)
# Includes the long running operations
apifuzzer_main:
extends: apifuzzer_fuzz
rules:
- if: $API_FUZZING_DISABLED
when: never
- if: $API_FUZZING_DISABLED_FOR_DEFAULT_BRANCH &&
$CI_DEFAULT_BRANCH == $CI_COMMIT_REF_NAME
when: never
- if: $CI_COMMIT_BRANCH &&
$CI_GITLAB_FIPS_MODE == "true"
variables:
FUZZAPI_IMAGE_SUFFIX: "-fips"
- if: $CI_COMMIT_BRANCH == $CI_DEFAULT_BRANCHTroubleshooting
API Fuzzing job times out after N hours
The top two reasons for the API Fuzzing job timing out are slow operations (> 1 second) and using a single-CPU runner for API Fuzzing (GitLab shared runners are single-CPU). Before you can diagnose the problem further, the job must complete so the output can be analyzed. We recommend to start with a multi-CPU runner first, then exclude portions of your API operations until the job completes and the output can be further reviewed.
See the following documentation sections for assistance:
- Performance tuning and testing speed
- Using a multi-CPU Runner
- Excluding operations by path
- Excluding slow operations
API Fuzzing job takes too long to complete
See Performance Tuning and Testing Speed
Error waiting for API Fuzzing 'http://127.0.0.1:5000' to become available
A bug exists in versions of the API Fuzzing analyzer prior to v1.6.196 that can cause a background process to fail under certain conditions. The solution is to update to a newer version of the API Fuzzing analyzer.
The version information can be found in the job details for the apifuzzer_fuzz job.
If the issue is occurring with versions v1.6.196 or greater, contact Support and provide the following information:
- Reference this troubleshooting section and ask for the issue to be escalated to the Dynamic Analysis Team.
- The full console output of the job.
- The
gl-api-security-scanner.logfile available as a job artifact. In the right-hand panel of the job details page, select the Browse button. - The
apifuzzer_fuzzjob definition from your.gitlab-ci.ymlfile.
Error message
- In GitLab 15.6 and later,
Error waiting for API Fuzzing 'http://127.0.0.1:5000' to become available - In GitLab 15.5 and earlier,
Error waiting for API Security 'http://127.0.0.1:5000' to become available.
Failed to start session with scanner. Please retry, and if the problem persists reach out to support.
The API Fuzzing engine outputs an error message when it cannot establish a connection with the scanner application component. The error message is shown in the job output window of the apifuzzer_fuzz job. A common cause for this issue is that the background component cannot use the selected port as it's already in use. This error can occur intermittently if timing plays a part (race condition). This issue occurs most often with Kubernetes environments when other services are mapped into the container causing port conflicts.
Before proceeding with a solution, it is important to confirm that the error message was produced because the port was already taken. To confirm this was the cause:
-
Go to the job console.
-
Look for the artifact
gl-api-security-scanner.log. You can either download all artifacts by selecting Download and then search for the file, or directly start searching by selecting Browse. -
Open the file
gl-api-security-scanner.login a text editor. -
If the error message was produced because the port was already taken, you should see in the file a message like the following:
-
Failed to bind to address http://127.0.0.1:5500: address already in use. -
In GitLab 15.4 and earlier:
Failed to bind to address http://[::]:5000: address already in use.
The text http://[::]:5000 in the previous message could be different in your case, for instance it could be http://[::]:5500 or http://127.0.0.1:5500. As long as the remaining parts of the error message are the same, it is safe to assume the port was already taken.
If you did not find evidence that the port was already taken, check other troubleshooting sections which also address the same error message shown in the job console output. If there are no more options, feel free to get support or request an improvement through the proper channels.
Once you have confirmed the issue was produced because the port was already taken. Then, GitLab 15.5 and later introduced the configuration variable FUZZAPI_API_PORT. This configuration variable allows setting a fixed port number for the scanner background component.
Solution
- Ensure your
.gitlab-ci.ymlfile defines the configuration variableFUZZAPI_API_PORT. - Update the value of
FUZZAPI_API_PORTto any available port number greater than 1024. We recommend checking that the new value is not in used by GitLab. See the full list of ports used by GitLab in Package defaults
Error, the OpenAPI document is not valid. Errors were found during validation of the document using the published OpenAPI schema
At the start of an API Fuzzing job the OpenAPI Specification is validated against the published schema. This error is shown when the provided OpenAPI Specification has validation errors. Errors can be introduced when creating an OpenAPI Specification manually, and also when the schema is generated.
For OpenAPI Specifications that are generated automatically validation errors are often the result of missing code annotations.
Error message
- In GitLab 13.11 and later,
Error, the OpenAPI document is not valid. Errors were found during validation of the document using the published OpenAPI schemaOpenAPI 2.0 schema validation error ...OpenAPI 3.0.x schema validation error ...
Solution
For generated OpenAPI Specifications
- Identify the validation errors.
- Use the Swagger Editor to identify validation problems in your specification. The visual nature of the Swagger Editor makes it easier to understand what needs to change.
- Alternatively, you can check the log output and look for schema validation warnings. They are prefixed with messages such as
OpenAPI 2.0 schema validation errororOpenAPI 3.0.x schema validation error. Each failed validation provides extra information aboutlocationanddescription. JSON Schema validation messages can be complex, and editors can help you validate schema documents.
- Review the documentation for the OpenAPI generation your framework/tech stack is using. Identify the changes needed to produce a correct OpenAPI document.
- After the validation issues are resolved, re-run your pipeline.
For manually created OpenAPI Specifications
- Identify the validation errors.
- The simplest solution is to use a visual tool to edit and validate the OpenAPI document. For example the Swagger Editor highlights schema errors and possible solutions.
- Alternatively, you can check the log output and look for schema validation warnings. They are prefixed with messages such as
OpenAPI 2.0 schema validation errororOpenAPI 3.0.x schema validation error. Each failed validation provides extra information aboutlocationanddescription. Correct each of the validation failures and then resubmit the OpenAPI doc. JSON Schema validation messages can be complex, and editors can help you validate schema documents.
- After the validation issues are resolved, re-run your pipeline.
Failed to start scanner session (version header not found)
The API Fuzzing engine outputs an error message when it cannot establish a connection with the scanner application component. The error message is shown in the job output window of the apifuzzer_fuzz job. A common cause of this issue is changing the FUZZAPI_API variable from its default.
Error message
- In GitLab 13.11 and later,
Failed to start scanner session (version header not found). - In GitLab 13.10 and earlier,
API Security version header not found. Are you sure that you are connecting to the API Security server?.
Solution
- Remove the
FUZZAPI_APIvariable from the.gitlab-ci.ymlfile. The value is inherited from the API Fuzzing CI/CD template. We recommend this method instead of manually setting a value. - If removing the variable is not possible, check to see if this value has changed in the latest version of the API Fuzzing CI/CD template. If so, update the value in the
.gitlab-ci.ymlfile.
Application cannot determine the base URL for the target API
The API Fuzzing analyzer outputs an error message when it cannot determine the target API after inspecting the OpenAPI document. This error message is shown when the target API has not been set in the .gitlab-ci.ymlfile, it is not available in the environment_url.txt file, and it could not be computed using the OpenAPI document.
There is an order of precedence in which the API Fuzzing analyzer tries to get the target API when checking the different sources. First, it tries to use the FUZZAPI_TARGET_URL. If the environment variable has not been set, then the API Fuzzing analyzer attempts to use the environment_url.txt file. If there is no file environment_url.txt, the API Fuzzing analyzer now uses the OpenAPI document contents and the URL provided in FUZZAPI_OPENAPI (if a URL is provided) to try to compute the target API.
The best-suited solution depends on whether or not your target API changes for each deployment:
- If the target API is the same for each deployment (a static environment), use the static environment solution.
- If the target API changes for each deployment, use a dynamic environment solution.
Static environment solution
This solution is for pipelines in which the target API URL doesn't change (is static).
Add environmental variable
For environments where the target API remains the same, we recommend you specify the target URL by using the FUZZAPI_TARGET_URL environment variable. In your .gitlab-ci.yml file, add a variable FUZZAPI_TARGET_URL. The variable must be set to the base URL of API testing target. For example:
stages:
- fuzz
include:
- template: API-Fuzzing.gitlab-ci.yml
variables:
FUZZAPI_TARGET_URL: http://test-deployment/
FUZZAPI_OPENAPI: test-api-specification.jsonDynamic environment solutions
In a dynamic environment your target API changes for each different deployment. In this case, there is more than one possible solution, we recommend to use the environment_url.txt file when dealing with dynamic environments.
Use environment_url.txt
To support dynamic environments in which the target API URL changes during each pipeline, API Fuzzing supports the use of an environment_url.txt file that contains the URL to use. This file is not checked into the repository, instead it's created during the pipeline by the job that deploys the test target and collected as an artifact that can be used by later jobs in the pipeline. The job that creates the environment_url.txt file must run before the API Fuzzing job.
- Modify the test target deployment job adding the base URL in an
environment_url.txtfile at the root of your project. - Modify the test target deployment job collecting the
environment_url.txtas an artifact.
Example:
deploy-test-target:
script:
# Perform deployment steps
# Create environment_url.txt (example)
- echo http://${CI_PROJECT_ID}-${CI_ENVIRONMENT_SLUG}.example.org > environment_url.txt
artifacts:
paths:
- environment_url.txtUse OpenAPI with an invalid schema
There are cases where the document is autogenerated with an invalid schema or cannot be edited manually in a timely manner. In those scenarios, the API Fuzzing is able to perform a relaxed validation by setting the variable FUZZAPI_OPENAPI_RELAXED_VALIDATION. We recommend providing a fully compliant OpenAPI document to prevent unexpected behaviors.
Edit a non-compliant OpenAPI file
To detect and correct elements that don't comply with the OpenAPI specifications, we recommend using an editor. An editor commonly provides document validation, and suggestions to create a schema-compliant OpenAPI document. Suggested editors include:
| Editor | OpenAPI 2.0 | OpenAPI 3.0.x | OpenAPI 3.1.x |
|---|---|---|---|
| Swagger Editor | {check-circle} YAML, JSON | {check-circle} YAML, JSON | {dotted-circle} YAML, JSON |
| Stoplight Studio | {check-circle} YAML, JSON | {check-circle} YAML, JSON | {check-circle} YAML, JSON |
If your OpenAPI document is generated manually, load your document in the editor and fix anything that is non-compliant. If your document is generated automatically, load it in your editor to identify the issues in the schema, then go to the application and perform the corrections based on the framework you are using.
Enable OpenAPI relaxed validation
Relaxed validation is meant for cases when the OpenAPI document cannot meet OpenAPI specifications, but it still has enough content to be consumed by different tools. A validation is performed but less strictly in regards to document schema.
API Fuzzing can still try to consume an OpenAPI document that does not fully comply with OpenAPI specifications. To instruct API Fuzzing analyzer to perform a relaxed validation, set the variable FUZZAPI_OPENAPI_RELAXED_VALIDATION to any value, for example:
stages:
- fuzz
include:
- template: API-Fuzzing.gitlab-ci.yml
variables:
  FUZZAPI_PROFILE: Quick-10
FUZZAPI_TARGET_URL: http://test-deployment/
FUZZAPI_OPENAPI: test-api-specification.json
FUZZAPI_OPENAPI_RELAXED_VALIDATION: 'On'
No operation in the OpenAPI document is consuming any supported media type
API Fuzzing uses the specified media types in the OpenAPI document to generate requests. If no request can be created due to the lack of supported media types, then an error is thrown.
Error message
- In GitLab 14.10 and later,
Error, no operation in the OpenApi document is consuming any supported media type. Check 'OpenAPI Specification' to check the supported media types.
Solution
- Review the supported media types in the OpenAPI Specification section.
- Edit your OpenAPI document, allowing at least a given operation to accept any of the supported media types. Alternatively, a supported media type could be set in the OpenAPI document level and get applied to all operations. This step may require changes in your application to ensure the supported media type is accepted by the application.
Error, error occurred trying to download `<URL>`: There was an error when retrieving content from Uri:' <URL>'. Error:The SSL connection could not be established, see inner exception.
API fuzzing is compatible with a broad range of TLS configurations, including outdated protocols and ciphers. Despite broad support, you might encounter connection errors. This error occurs because API fuzzing could not establish a secure connection with the server at the given URL.
To resolve the issue:
If the host in the error message supports non-TLS connections, change https:// to http:// in your configuration.
For example, if an error occurs with the following configuration:
stages:
  - fuzz

include:
  - template: API-Fuzzing.gitlab-ci.yml

variables:
  FUZZAPI_TARGET_URL: https://test-deployment/
  FUZZAPI_OPENAPI: https://specs/openapi.json
Change the prefix of FUZZAPI_OPENAPI from https:// to http://:
stages:
  - fuzz

include:
  - template: API-Fuzzing.gitlab-ci.yml

variables:
  FUZZAPI_TARGET_URL: https://test-deployment/
  FUZZAPI_OPENAPI: http://specs/openapi.json
If you cannot use a non-TLS connection to access the URL, contact the Support team for help.
You can expedite the investigation with the testssl.sh tool. From a machine with a bash shell and connectivity to the affected server:
- Download the latest release
ziportar.gzfile and extract from https://github.com/drwetter/testssl.sh/releases. - Run
./testssl.sh --log https://specs. - Attach the log file to your support ticket.
Get support or request an improvement
To get support for your particular problem use the getting help channels.
The GitLab issue tracker on GitLab.com is the right place for bugs and feature proposals about API Security and API Fuzzing.
Use ~"Category:API Security" label when opening a new issue regarding API fuzzing to ensure it is quickly reviewed by the right people. Refer to our review response SLO to understand when you should receive a response.
Search the issue tracker for similar entries before submitting your own, there's a good chance somebody else had the same issue or feature proposal. Show your support with an award emoji and or join the discussion.
When experiencing a behavior not working as expected, consider providing contextual information:
- GitLab version if using a self-managed instance.
-
.gitlab-ci.ymljob definition. - Full job console output.
- Scanner log file available as a job artifact named
gl-api-security-scanner.log.
WARNING: Sanitize data attached to a support issue. Remove sensitive information, including: credentials, passwords, tokens, keys, and secrets.
Glossary
- Assert: Assertions are detection modules used by checks to trigger a fault. Many assertions have configurations. A check can use multiple Assertions. For example, Log Analysis, Response Analysis, and Status Code are common Assertions used together by checks. Checks with multiple Assertions allow them to be turned on and off.
- Check: Performs a specific type of test, or performed a check for a type of vulnerability. For example, the JSON Fuzzing Check performs fuzz testing of JSON payloads. The API fuzzer is comprised of several checks. Checks can be turned on and off in a profile.
- Fault: During fuzzing, a failure identified by an Assert is called a fault. Faults are investigated to determine if they are a security vulnerability, a non-security issue, or a false positive. Faults don't have a known vulnerability type until they are investigated. Example vulnerability types are SQL Injection and Denial of Service.
- Profile: A configuration file has one or more testing profiles, or sub-configurations. You may have a profile for feature branches and another with extra testing for a main branch.